1
2
3
4
5
6
7
8
9
10
11
12
13
14
15
16
17
18
19
20
21
22
23
24
25
26
27
28
29
30
31
32
33
34
35
36
37
38
39
40
41
42
43
44
45
46
47
48
49
50
51
52
53
54
55
56
57
58
59
60
61
62
63
64
65
66
67
68
69
70
71
72
73
74
75
76
77
78
79
80
81
82
83
84
85
86
87
88
89
90
91
92
93
94
95
96
97
98
99
100
101
102
103
104
105
106
107
108
109
110
111
112
113
114
115
116
117
118
119
120
121
122
123
124
125
126
127
128
129
130
131
132
133
134
135
136
137
138
139
140
141
142
143
144
145
146
147
148
149
150
151
152
153
154
155
156
157
158
159
160
161
162
163
164
165
166
167
168
169
170
171
172
173
174
175
176
177
178
179
180
181
182
183
184
185
186
187
188
189
190
191
192
193
194
195
196
197
198
199
200
201
202
203
204
205
206
207
208
209
210
211
212
213
214
215
216
217
218
219
220
221
222
223
224
225
226
227
228
229
230
231
232
233
234
235
236
237
238
239
240
241
242
243
244
245
246
247
248
249
250
251
252
253
254
255
256
257
258
259
260
261
262
263
264
265
266
267
268
269
270
271
272
273
274
275
276
277
278
279
280
281
282
283
284
285
286
287
288
289
290
291
292
293
294
295
296
|
---
stage: Plan
group: Project Management
info: To determine the technical writer assigned to the Stage/Group associated with this page, see https://handbook.gitlab.com/handbook/product/ux/technical-writing/#assignments
---
# Customer relations management (CRM)
DETAILS:
**Tier:** Free, Premium, Ultimate
**Offering:** GitLab.com, Self-managed, GitLab Dedicated
> - [Introduced](https://gitlab.com/gitlab-org/gitlab/-/issues/2256) in GitLab 14.6 [with a flag](../../administration/feature_flags.md) named `customer_relations`. Disabled by default.
> - In GitLab 14.8 and later, you can [create contacts and organizations only in top-level groups](https://gitlab.com/gitlab-org/gitlab/-/issues/350634).
> - [Enabled on GitLab.com and self-managed](https://gitlab.com/gitlab-org/gitlab/-/issues/346082) in GitLab 15.0.
> - [Feature flag removed](https://gitlab.com/gitlab-org/gitlab/-/issues/346082) in GitLab 15.1.
With customer relations management (CRM) you can create a record of contacts
(individuals) and organizations (companies) and relate them to issues.
By default, contacts and organizations can only be created for top-level groups.
To create contacts and organizations in other groups, [assign the group as a contact source](#configure-the-contact-source).
You can use contacts and organizations to tie work to customers for billing and reporting purposes.
For more information about what is planned for the future, see [issue 2256](https://gitlab.com/gitlab-org/gitlab/-/issues/2256).
## Permissions
| Permission | Guest | Group Reporter | Group Developer, Maintainer, and Owner |
| ---------- | ---------------- | -------------- | -------------------------------------- |
| View contacts/organizations | | ✓ | ✓ |
| View issue contacts | | ✓ | ✓ |
| Add/remove issue contacts | | ✓ | ✓ |
| Create/edit contacts/organizations | | | ✓ |
## Enable customer relations management (CRM)
> - [Enabled by default](https://gitlab.com/gitlab-org/gitlab/-/merge_requests/108378) in GitLab 16.9.
Customer relations management features are enabled at the group level. If your
group also contains subgroups, and you want to use CRM features in the subgroup,
CRM features must also be enabled for the subgroup.
To enable customer relations management in a group or subgroup:
1. On the left sidebar, select **Search or go to** and find your group or subgroup.
1. Select **Settings > General**.
1. Expand the **Permissions and group features** section.
1. Select **Customer relations is enabled**.
1. Select **Save changes**.
## Configure the contact source
> - [Available](https://gitlab.com/gitlab-org/gitlab/-/merge_requests/167475) in GitLab 17.6.
By default, contacts are sourced from an issue's top-level group.
The contact source for a group will apply to all subgroups,
unless they have a contact source configured.
To configure the contact source for a group or subgroup:
1. On the left sidebar, select **Search or go to** and find your group or subgroup.
1. Select **Settings > General**.
1. Expand the **Permissions and group features** section.
1. Select **Contact source > Search for a group**.
1. Select the group from which you wish to source contacts.
1. Select **Save changes**.
## Contacts
### View contacts linked to a group
Prerequisites:
- You must have at least the Reporter role for the group.
To view a group's contacts:
1. On the left sidebar, select **Search or go to** and find your group.
1. Select **Plan > Customer relations**.
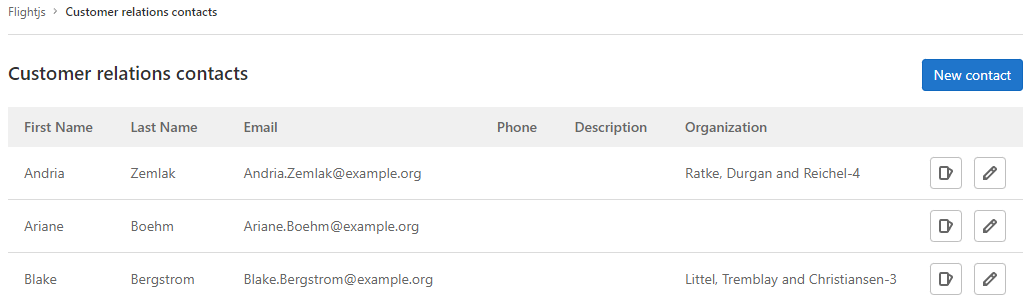
### Create a contact
Prerequisites:
- You must have at least the Developer role for the group.
To create a contact:
1. On the left sidebar, select **Search or go to** and find your group.
1. Select **Plan > Customer relations**.
1. Select **New contact**.
1. Complete all required fields.
1. Select **Create new contact**.
You can also [create](../../api/graphql/reference/index.md#mutationcustomerrelationscontactcreate)
contacts using the GraphQL API.
### Edit a contact
Prerequisites:
- You must have at least the Developer role for the group.
To edit an existing contact:
1. On the left sidebar, select **Search or go to** and find your group.
1. Select **Plan > Customer relations**.
1. Next to the contact you wish to edit, select **Edit** (**{pencil}**).
1. Edit the required fields.
1. Select **Save changes**.
You can also [edit](../../api/graphql/reference/index.md#mutationcustomerrelationscontactupdate)
contacts using the GraphQL API.
#### Change the state of a contact
Each contact can be in one of two states:
- **Active**: contacts in this state can be added to an issue.
- **Inactive**: contacts in this state cannot be added to an issue.
To change the state of a contact:
1. On the left sidebar, select **Search or go to** and find your group.
1. Select **Plan > Customer relations**.
1. Next to the contact you wish to edit, select **Edit** (**{pencil}**).
1. Select or clear the **Active** checkbox.
1. Select **Save changes**.
## Organizations
### View organizations
Prerequisites:
- You must have at least the Reporter role for the group.
To view a group's organizations:
1. On the left sidebar, select **Search or go to** and find your group.
1. Select **Plan > Customer relations**.
1. In the upper right, select **Organizations**.

### Create an organization
Prerequisites:
- You must have at least the Developer role for the group.
To create an organization:
1. On the left sidebar, select **Search or go to** and find your group.
1. Select **Plan > Customer relations**.
1. In the upper right, select **Organizations**.
1. Select **New organization**.
1. Complete all required fields.
1. Select **Create new organization**.
You can also [create](../../api/graphql/reference/index.md#mutationcustomerrelationsorganizationcreate)
organizations using the GraphQL API.
### Edit an organization
Prerequisites:
- You must have at least the Developer role for the group.
To edit an existing organization:
1. On the left sidebar, select **Search or go to** and find your group.
1. Select **Plan > Customer relations**.
1. In the upper right, select **Organizations**.
1. Next to the organization you wish to edit, select **Edit** (**{pencil}**).
1. Edit the required fields.
1. Select **Save changes**.
You can also [edit](../../api/graphql/reference/index.md#mutationcustomerrelationsorganizationupdate)
organizations using the GraphQL API.
## Issues
If you use [Service Desk](../project/service_desk/index.md) and create issues from emails,
issues are linked to contacts matching the email addresses in the sender and CC of the email.
### View issues linked to a contact
Prerequisites:
- You must have at least the Reporter role for the group.
To view a contact's issues, select a contact from the issue sidebar, or:
1. On the left sidebar, select **Search or go to** and find your group.
1. Select **Plan > Customer relations**.
1. Next to the contact whose issues you wish to view, select **View issues** (**{issues}**).
### View issues linked to an organization
Prerequisites:
- You must have at least the Reporter role for the group.
To view an organization's issues:
1. On the left sidebar, select **Search or go to** and find your group.
1. Select **Plan > Customer relations**.
1. In the upper right, select **Organizations**.
1. Next to the organization whose issues you wish to view, select **View issues** (**{issues}**).
### View contacts linked to an issue
Prerequisites:
- You must have at least the Reporter role for the group.
You can view contacts associated with an issue in the right sidebar.
To view a contact's details, hover over the contact's name.

You can also view issue contacts using the
[GraphQL](../../api/graphql/reference/index.md#mutationcustomerrelationsorganizationcreate)
API.
### Add contacts to an issue
Prerequisites:
- You must have at least the Reporter role for the group.
To add [active](#change-the-state-of-a-contact) contacts to an issue use the `/add_contacts [contact:address@example.com]`
[quick action](../project/quick_actions.md).
You can also add, remove, or replace issue contacts using the
[GraphQL](../../api/graphql/reference/index.md#mutationissuesetcrmcontacts)
API.
### Remove contacts from an issue
Prerequisites:
- You must have at least the Reporter role for the group.
To remove contacts from an issue use the `/remove_contacts [contact:address@example.com]`
[quick action](../project/quick_actions.md).
You can also add, remove, or replace issue contacts using the
[GraphQL](../../api/graphql/reference/index.md#mutationissuesetcrmcontacts)
API.
## Autocomplete contacts
> - [Introduced](https://gitlab.com/gitlab-org/gitlab/-/issues/2256) in GitLab 14.8 [with a flag](../../administration/feature_flags.md) named `contacts_autocomplete`. Disabled by default.
> - [Enabled on GitLab.com and self-managed](https://gitlab.com/gitlab-org/gitlab/-/issues/352123) in GitLab 15.0.
> - [Generally available](https://gitlab.com/gitlab-org/gitlab/-/issues/352123) in GitLab 15.2. [Feature flag `contacts_autocomplete`](https://gitlab.com/gitlab-org/gitlab/-/issues/352123) removed.
When you use the `/add_contacts` quick action, follow it with `[contact:` and an autocomplete list with the [active](#change-the-state-of-a-contact) contacts appears:
```plaintext
/add_contacts [contact:
```
When you use the `/remove_contacts` quick action, follow it with `[contact:` and an autocomplete list with the contacts added to the issue appears:
```plaintext
/remove_contacts [contact:
```
## Moving objects with CRM entries
When you move an issue or project and the **parent group contact source matches**,
issues retain their contacts.
When you move an issue or project and the **parent group contact source changes**,
issues lose their contacts.
When you move a group with a [contact source configured](#configure-the-contact-source)
or it's **contact source remains unchanged**,
issues retain their contacts.
When you move a group and its **contact source changes**:
- All unique contacts and organizations are migrated to the new top-level group.
- Contacts that already exist (by email address) are deemed duplicates and deleted.
- Organizations that already exist (by name) are deemed duplicates and deleted.
- All issues retain their contacts or are updated to point at contacts with the same email address.
If you do not have permission to create contacts and organizations in the new
top-level group, the group transfer fails.
|
