1
2
3
4
5
6
7
8
9
10
11
12
13
14
15
16
17
18
19
20
21
22
23
24
25
26
27
28
29
30
31
32
33
34
35
36
37
38
39
40
41
42
43
44
45
46
47
48
49
50
51
52
53
54
55
56
57
58
59
60
61
62
63
64
65
66
67
68
69
70
71
72
73
74
75
76
77
78
79
80
81
82
83
84
85
86
87
88
89
90
91
92
93
94
95
96
97
98
99
100
101
102
103
104
105
106
107
108
109
110
111
112
113
114
115
116
117
118
119
120
121
122
123
124
125
126
127
128
129
130
131
132
133
134
135
136
137
138
139
140
141
142
143
144
145
146
147
148
149
150
151
152
153
154
155
156
157
158
159
160
161
162
163
164
165
166
167
168
169
170
171
172
173
174
175
176
177
178
179
180
181
182
183
184
185
186
187
188
189
190
191
192
193
194
195
196
197
198
199
200
201
202
203
204
205
206
207
208
209
210
211
212
213
214
215
216
217
218
219
220
221
222
223
224
225
226
227
228
229
230
231
232
233
234
235
236
237
238
239
240
241
242
243
244
245
246
247
248
249
250
251
252
253
254
255
256
257
258
259
260
261
262
263
264
265
266
267
268
269
270
271
272
273
274
275
276
277
278
279
280
281
282
283
284
285
286
287
288
289
290
291
292
293
294
295
296
297
298
299
300
301
302
303
304
305
306
307
308
309
310
311
312
313
314
315
316
317
318
319
320
321
322
323
324
325
326
327
328
329
330
331
332
333
334
335
336
337
338
339
340
341
342
343
344
345
346
347
348
349
350
351
352
353
354
355
356
357
358
359
360
361
362
363
364
365
366
367
368
369
370
371
372
373
374
375
376
377
378
379
380
381
382
383
384
385
386
387
388
389
390
391
392
393
394
395
396
397
398
399
400
401
402
403
404
405
406
407
408
409
410
411
412
413
414
415
416
417
418
419
420
421
422
423
424
425
426
427
428
429
430
431
432
433
434
435
436
437
438
439
440
441
442
443
444
445
446
447
448
449
450
451
452
453
454
455
456
457
458
459
460
461
462
463
464
465
466
467
468
469
470
471
472
473
474
475
476
477
478
479
480
481
482
483
484
485
486
487
488
489
490
491
492
493
494
495
496
497
498
499
500
501
502
503
504
505
506
507
|
---
stage: Plan
group: Project Management
info: To determine the technical writer assigned to the Stage/Group associated with this page, see https://handbook.gitlab.com/handbook/product/ux/technical-writing/#assignments
---
# Labels
DETAILS:
**Tier:** Free, Premium, Ultimate
**Offering:** GitLab.com, Self-managed, GitLab Dedicated
Labels are a way to categorize and filter issues, merge requests, and epics in GitLab.
As your projects grow in GitLab, it gets more challenging to keep track of the work that's done.
Especially as your organization grows from just a few people to
hundreds or thousands. With labels, you can organize and tag your work, and track the work items
you're interested in.
Labels are a key part of [issue boards](issue_board.md).
Use labels on [epics](../group/epics/index.md), issues, and merge requests to:
- Categorize items using colors and descriptive titles like `bug`, `feature request`, or `docs`.
- Dynamically filter and manage items to view work that's in progress or completed.
- Search lists and boards.
- Communicate priority or severity of items, using [scoped labels](#scoped-labels).
## Types of labels
You can use two types of labels in GitLab:
- **Project labels** can be assigned to issues and merge requests in that project only.
- **Group labels** can be assigned to issues, merge requests, and [epics](../group/epics/index.md)
in any project in the selected group or its subgroups.
## Assign and unassign labels
> - Real-time updates in the sidebar [introduced](https://gitlab.com/gitlab-org/gitlab/-/issues/241538) in GitLab 14.10 with a [feature flag](../../administration/feature_flags.md) named `realtime_labels`, disabled by default.
> - Real-time updates in the sidebar [enabled on GitLab.com](https://gitlab.com/gitlab-org/gitlab/-/issues/357370#note_991987201) in GitLab 15.1.
> - Real-time updates in the sidebar [enabled by default](https://gitlab.com/gitlab-org/gitlab/-/issues/357370) in GitLab 15.5.
> - Real-time updates in the sidebar [generally available](https://gitlab.com/gitlab-org/gitlab/-/merge_requests/103199) in GitLab 15.6. Feature flag `realtime_labels` removed.
You can assign labels to any issue, merge request, or epic.
Changed labels are immediately visible to other users, without refreshing the page, on the following:
- Epics
- Incidents
- Issues
- Merge requests
To assign or unassign a label:
1. In the **Labels** section of the sidebar, select **Edit**.
1. In the **Assign labels** list, search for labels by typing their names.
You can search repeatedly to add more labels.
The selected labels are marked with a checkmark.
1. Select the labels you want to assign or unassign.
1. To apply your changes to labels, select **X** next to **Assign labels** or select any area
outside the label section.
Alternatively, to unassign a label, select the **X** on the label you want to unassign.
You can also assign and unassign labels with [quick actions](quick_actions.md):
- Assign labels with `/label`.
- Remove labels with `/unlabel`.
- Remove all labels and assign new ones with `/relabel`.
## View available labels
### View project labels
To view the **project's labels**:
1. On the left sidebar, select **Search or go to** and find your project.
1. Select **Manage > Labels**.
Or:
1. View an issue or merge request.
1. On the right sidebar, in the **Labels** section, select **Edit**.
1. Select **Manage project labels**.
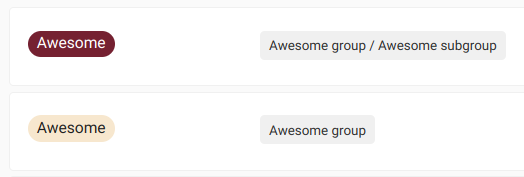
The list of labels includes both the labels created in the project and
all labels created in the project's ancestor groups. For each label, you can see the
project or group path where it was created.
### View group labels
To view the **group's labels**:
1. On the left sidebar, select **Search or go to** and find your group.
1. Select **Manage > Labels**.
Or:
1. View an epic.
1. On the right sidebar, in the **Labels** section, select **Edit**.
1. Select **Manage group labels**.
The list includes all labels created only in the group. It does not list any labels created in
the group's projects.
## Create a label
Prerequisites:
- You must have at least the Reporter role for the project or group.
### Create a project label
To create a project label:
1. On the left sidebar, select **Search or go to** and find your project.
1. Select **Manage > Labels**.
1. Select **New label**.
1. In the **Title** field, enter a short, descriptive name for the label. You
can also use this field to create [scoped, mutually exclusive labels](#scoped-labels).
1. Optional. In the **Description** field, enter additional
information about how and when to use this label.
1. Optional. Select a color by selecting from the available colors, or enter a hex color value for
a specific color in the **Background color** field.
1. Select **Create label**.
### Create a project label from an issue or merge request
You can also create a new project label from an issue or merge request.
Labels you create this way belong to the same project as the issue or merge request.
Prerequisites:
- You must have at least the Reporter role for the project.
To do so:
1. View an issue or merge request.
1. On the right sidebar, in the **Labels** section, select **Edit**.
1. Select **Create project label**.
1. Fill in the name field. You can't specify a description if creating a label this way.
You can add a description later by [editing the label](#edit-a-label).
1. Select a color by selecting from the available colors, or enter a hex color value for a specific color.
1. Select **Create**. Your label is created and selected.
### Create a group label
To create a group label:
1. On the left sidebar, select **Search or go to** and find your group.
1. Select **Manage > Labels**.
1. Select **New label**.
1. In the **Title** field, enter a short, descriptive name for the label. You
can also use this field to create [scoped, mutually exclusive labels](#scoped-labels).
1. Optional. In the **Description** field, enter additional
information about how and when to use this label.
1. Optional. Select a color by selecting from the available colors, or enter a hex color value for
a specific color in the **Background color** field.
1. Select **Create label**.
### Create a group label from an epic
DETAILS:
**Tier:** Premium, Ultimate
**Offering:** GitLab.com, Self-managed, GitLab Dedicated
You can also create a new group label from an epic.
Labels you create this way belong to the same group as the epic.
Prerequisites:
- You must have at least the Reporter role for the group.
To do so:
1. View an epic.
1. On the right sidebar, in the **Labels** section, select **Edit**.
1. Select **Create group label**.
1. Fill in the name field. You can't specify a description if creating a label this way.
You can add a description later by [editing the label](#edit-a-label).
1. Select a color by selecting from the available colors,enter input a hex color value for a specific color.
1. Select **Create**.
## Edit a label
Prerequisites:
- You must have at least the Reporter role for the project or group.
### Edit a project label
To edit a **project** label:
1. On the left sidebar, select **Search or go to** and find your project.
1. Select **Manage > Labels**.
1. Next to the label you want to edit, select the vertical ellipsis (**{ellipsis_v}**), and then select **Edit**.
1. Select **Save changes**.
### Edit a group label
To edit a **group** label:
1. On the left sidebar, select **Search or go to** and find your group.
1. Select **Manage > Labels**.
1. Next to the label you want to edit, select the vertical ellipsis (**{ellipsis_v}**), and then select **Edit**.
1. Select **Save changes**.
## Delete a label
WARNING:
If you delete a label, it is permanently deleted. All references to the label are removed from the
system and you cannot undo the deletion.
Prerequisites:
- You must have at least the Reporter role for the project.
### Delete a project label
To delete a **project** label:
1. On the left sidebar, select **Search or go to** and find your project.
1. Select **Manage > Labels**.
1. Next to the **Subscribe** button, select (**{ellipsis_v}**), and then select **Delete**.
### Delete a group label
To delete a **group** label:
1. On the left sidebar, select **Search or go to** and find your group.
1. Select **Manage > Labels**.
1. Either:
- Next to the **Subscribe** button, select (**{ellipsis_v}**).
- Next to the label you want to edit, select **Edit** (**{pencil}**).
1. Select **Delete**.
## Promote a project label to a group label
You might want to make a project label available for other
projects in the same group. Then, you can promote the label to a group label.
If other projects in the same group have a label with the same title, they are all
merged with the new group label. If a group label with the same title exists, it is
also merged.
WARNING:
Promoting a label is a permanent action and cannot be reversed.
Prerequisites:
- You must have at least the Reporter role for the project.
- You must have at least the Reporter role for the project's parent group.
To promote a project label to a group label:
1. On the left sidebar, select **Search or go to** and find your project.
1. Select **Manage > Labels**.
1. Next to the **Subscribe** button, select the three dots (**{ellipsis_v}**) and
select **Promote to group label**.
All issues, merge requests, issue board lists, issue board filters, and label subscriptions
with the old labels are assigned to the new group label.
The new group label has the same ID as the previous project label.
## Promote a subgroup label to the parent group
It's not possible to directly promote a group label to the parent group.
To achieve this, use the following workaround.
Prerequisites:
- There must be a group that contains subgroups ("parent group").
- There must be a subgroup in the parent group, that has a label you want to promote.
- You must have at least the Reporter role for both groups.
To "promote" the label to the parent group:
1. In the parent group, [create a label](#create-a-group-label) with the same name as the original
one. We recommend making it a different color so you don't mistake the two while you're doing this.
1. In the subgroup, [view its labels](#view-group-labels). You should see the two labels and where
they come from:
1. Next to the subgroup label (the old one), select **Issues**, **Merge requests**, or **Epics**.
1. Add the new label to issues, merge requests, and epics that have the old label.
To do it faster, use [bulk editing](issues/managing_issues.md#bulk-edit-issues-from-a-group).
1. In the subgroup or the parent group, [delete the label](#delete-a-group-label) that belongs to
the lower-level group.
You should now have a label in the parent group that is named the same as the old one, and added
to the same issues, MRs, and epics.
## Generate default project labels
If a project or its parent group has no labels, you can generate a default set of project
labels from the label list page.
Prerequisites:
- You must have at least the Reporter role for the project.
- The project must have no labels present.
To add the default labels to the project:
1. On the left sidebar, select **Search or go to** and find your project.
1. Select **Manage > Labels**.
1. Select **Generate a default set of labels**.
The following labels are created:
- `bug`
- `confirmed`
- `critical`
- `discussion`
- `documentation`
- `enhancement`
- `suggestion`
- `support`
## Scoped labels
DETAILS:
**Tier:** Premium, Ultimate
**Offering:** GitLab.com, Self-managed, GitLab Dedicated
Teams can use scoped labels to annotate issues, merge requests, and epics with mutually exclusive
labels. By preventing certain labels from being used together, you can create more complex workflows.
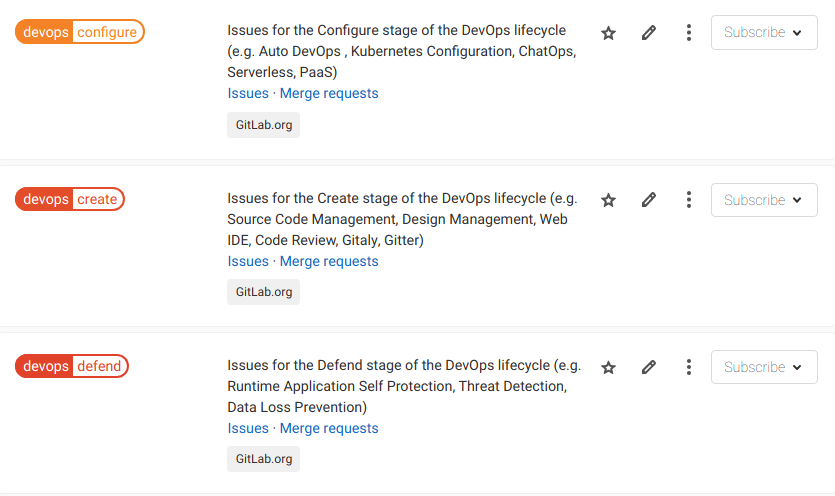
A scoped label uses a double-colon (`::`) syntax in its title, for example: `workflow::in-review`.
An issue, merge request, or epic cannot have two scoped labels, of the form `key::value`,
with the same `key`. If you add a new label with the same `key` but a different `value`,
the previous `key` label is replaced with the new label.
<div class="video-fallback">
See the video: <a href="https://www.youtube.com/watch?v=7l7tnEva6I8">Scoped Labels - Setting up your Organization with GitLab</a>.
</div>
<figure class="video-container">
<iframe src="https://www.youtube-nocookie.com/embed/7l7tnEva6I8" frameborder="0" allowfullscreen> </iframe>
</figure>
### Filter by scoped labels
To filter issue, merge request, or epic lists by a given scope, enter
`<scope>::*` in the searched label name.
For example, filtering by the `platform::*` label returns issues that have `platform::iOS`,
`platform::Android`, or `platform::Linux` labels.
NOTE:
Filtering by scoped labels not available on the issues or merge requests dashboard pages.
### Scoped labels examples
**Example 1.** Updating issue priority:
1. You decide that an issue is of low priority, and assign it the `priority::low` label.
1. After more review, you realize the issue's priority is higher increased, and you assign it the
`priority::high` label.
1. Because an issue shouldn't have two priority labels at the same time, GitLab removes the
`priority::low` label.
**Example 2.** You want a custom field in issues to track the operating system platform
that your features target, where each issue should only target one platform.
You create three labels:
- `platform::iOS`
- `platform::Android`
- `platform::Linux`
If you assign any of these labels to an issue automatically removes any other existing label that
starts with `platform::`.
**Example 3.** You can use scoped labels to represent the workflow states of your teams.
Suppose you have the following labels:
- `workflow::development`
- `workflow::review`
- `workflow::deployed`
If an issue already has the label `workflow::development` and a developer wants to show that the
issue is now under review, they assign the `workflow::review`, and the `workflow::development` label
is removed.
The same happens when you move issues across label lists in an
[issue board](issue_board.md). With scoped labels, team members not working in an
issue board can also advance workflow states consistently in issues themselves.
For a video explanation, see:
<div class="video-fallback">
See the video: <a href="https://www.youtube.com/watch?v=4BCBby6du3c">Use scoped labels for custom fields and custom workflows</a>.
</div>
<figure class="video-container">
<iframe src="https://www.youtube-nocookie.com/embed/4BCBby6du3c" frameborder="0" allowfullscreen> </iframe>
</figure>
### Nested scopes
You can create a label with a nested scope by using multiple double colons `::` when creating
it. In this case, everything before the last `::` is the scope.
For example, if your project has these labels:
- `workflow::backend::review`
- `workflow::backend::development`
- `workflow::frontend::review`
An issue **can't** have both `workflow::backend::review` and `workflow::backend::development`
labels at the same time, because they both share the same scope: `workflow::backend`.
On the other hand, an issue **can** have both `workflow::backend::review` and `workflow::frontend::review`
labels at the same time, because they both have different scopes: `workflow::frontend` and `workflow::backend`.
## Receive notifications when a label is used
You can subscribe to a label to [receive notifications](../profile/notifications.md) whenever the
label is assigned to an issue, merge request, or epic.
To subscribe to a label:
1. [View the label list page.](#view-available-labels)
1. To the right of any label, select **Subscribe**.
1. Optional. If you are subscribing to a group label from a project, select either:
- **Subscribe at project level** to be notified about events in this project.
- **Subscribe at group level** to be notified about events in the whole group.
## Set label priority
Labels can have relative priorities, which are used when you sort issue and merge request lists
by [label priority](issues/sorting_issue_lists.md#sorting-by-label-priority) and [priority](issues/sorting_issue_lists.md#sorting-by-priority).
When prioritizing labels, you must do it from a project.
It's not possible to do it from the group label list.
NOTE:
Priority sorting is based on the highest priority label only.
[This discussion](https://gitlab.com/gitlab-org/gitlab/-/issues/14523) considers changing this.
Prerequisites:
- You must have at least the Reporter role for the project.
To prioritize a label:
1. On the left sidebar, select **Search or go to** and find your project.
1. Select **Manage > Labels**.
1. Next to a label you want to prioritize, select the star (**{star-o}**).

This label now appears at the top of the label list, under **Prioritized Labels**.
To change the relative priority of these labels, drag them up and down the list.
The labels higher in the list get higher priority.
To learn what happens when you sort by priority or label priority, see
[Sorting and ordering issue lists](issues/sorting_issue_lists.md).
## Lock labels when a merge request is merged
DETAILS:
**Tier:** Free, Premium, Ultimate
**Offering:** Self-managed
**Status:** Beta
> - [Introduced](https://gitlab.com/gitlab-org/gitlab/-/issues/408676) in GitLab 16.3 [with a flag](../../administration/feature_flags.md) named `enforce_locked_labels_on_merge`. This feature is [beta](../../policy/experiment-beta-support.md). Disabled by default.
FLAG:
The availability of this feature is controlled by a feature flag.
For more information, see the history.
This feature is available for testing, but not ready for production use.
To comply with certain auditing requirements, you can set a label to be locked.
When a merge request with locked labels gets merged, nobody can remove them from the MR.
When you add locked labels to issues or epics, they behave like regular labels.
Prerequisites:
- You must have at least the Reporter role for the project or group.
WARNING:
After you set a label as locked, nobody can undo it or delete the label.
To set a label to get locked on merge:
1. On the left sidebar, select **Search or go to** and find your group or project.
1. Select **Manage > Labels**.
1. Next to the label you want to edit, select the vertical ellipsis (**{ellipsis_v}**), and then select **Edit**.
1. Select the **Lock label after a merge request is merged** checkbox.
1. Select **Save changes**.
## Related topics
Practice working with labels in the following tutorials:
- [Set up a single project for issue triage](../../tutorials/issue_triage/index.md)
- [Set up issue boards for team hand-off](../../tutorials/boards_for_teams/index.md)
|
