1
2
3
4
5
6
7
8
9
10
11
12
13
14
15
16
17
18
19
20
21
22
23
24
25
26
27
28
29
30
31
32
33
34
35
36
37
38
39
40
41
42
43
44
45
46
47
48
49
50
51
52
53
54
55
56
57
58
59
60
61
62
63
64
65
66
67
68
69
70
71
72
73
74
75
76
77
78
79
80
81
82
83
84
85
86
87
88
89
90
91
92
93
94
95
96
97
98
99
100
101
102
103
104
105
106
107
108
109
110
111
112
113
114
115
116
117
118
119
120
121
122
123
124
125
126
127
128
129
130
131
|
---
# Python Developer Information
---
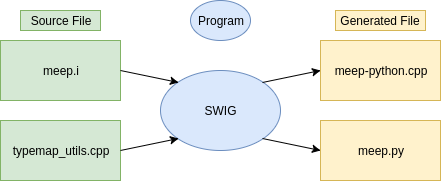
The `meep` Python package consists of a low-level interface and a high-level interface. The low-level interface is the direct result of running [SWIG](http://www.swig.org/) on the C++ headers.
Next, we compile `meep-python.cxx`, rename `meep.py` to `__init__.py` and put them in a folder called `meep`. Putting all the code in `__init__.py` allows us to access the symbols directly from the `meep` namespace rather than going through an additional module like `meep.meep.vec`. Now we have a complete Python package.

`__init__.py` contains "proxy" classes for all public `meep` objects. They hold a `this` pointer that dispatches to the appropriate C++ functions in the `_meep.so` extension module. The interface this package exposes is basically the same as the C++ interface. That is, a simulation written in this low-level Python interface would not look much different from the same simulation written in C++. By implementing a high-level interface on top of the basic SWIG wrappers, we can abstract away many of the low details of setting up a simulation, take advantage of Python language features like keyword arguments, and gain productivity from libraries like NumPy.
[TOC]
## Package Organization
After adding the high-level interface files, the `meep` package looks like this.
```bash
meep
├── __init__.py
├── _meep.so
├── geom.py
├── simulation.py
└── source.py
```
The Python MPB interface is also included in the `meep` package. It's constructed in the same manner as the `meep` package. The low-level interface is in `meep/mpb/__init__.py` and `meep/mpb/_mpb.so`, and the high-level interface is in `solver.py`. Here is a view of the complete package.
```bash
meep
├── mpb
│ ├── __init__.py
│ ├── _mpb.so
│ ├── mpb_data.py
│ └── solver.py
├── __init__.py
├── _meep.so
├── geom.py
├── simulation.py
└── source.py
```
## Description of Files
### `meep.i`
SWIG interface file for the `meep` Python module. Includes typemaps, helper functions, and module initialization code. The typemaps mostly call other helper functions defined either in `meep.i`, or in `typemap_utils.cpp` (if the function is used in `mpb.i` too). There are also various `py_*_wrap` functions that handle calling user defined Python functions from C++. Everything in the `%pythoncode` block at the end of the file is run once when the `meep` module is first imported. See the [SWIG documenation](http://www.swig.org/Doc3.0/SWIGDocumentation.html) for more details.
### `vec.i`
SWIG interface file for `vec.hpp`. Included into `meep.i`. SWIG warnings are disabled (if found benign) in this file.
### `numpy.i`
Typemaps for `numpy` arrays (taken from the NumPy [Github repository](https://github.com/numpy/numpy/blob/master/tools/swig/numpy.i)). See the [documentation](https://docs.scipy.org/doc/numpy-1.13.0/reference/swig.interface-file.html) for instructions on using these typemaps.
### `typemap_utils.cpp`
Utility functions for writing SWIG typemaps. Since this file is included into both `meep.i` and `mpb.i`, only code that is useful to both interface files should be put here (otherwise the compiler complains about unused functions). Code used only by one interface should be put in the respective `.i` file. The majority of the code in this file is for converting the Python geometric objects defined in `geom.py` to C objects. The `get_attr_*` functions are helpers for getting C versions of attributes on Python objects. The convention in the file is for functions to return `1` on success and `0` on failure so that the top level typemaps in `meep.i` can be written as:
```c++
%typemap(in) type {
if(!py_type_to_type($input, &$1)) {
SWIG_fail;
}
}
```
Keeping the code within `%typemap` blocks small is valuable because it gets copied everywhere the typemap is used, which can lead to code bloat.
### `geom.py`
Pure Python implementations of the geometric objects defined in `libctl`. The user-defined list of objects (`Simulation.geometry`) gets converted to C objects when `meep.set_materials_from_geometry` is called in `Simulation._init_structure`. The function responsible for this conversion is `typemap_utils.cpp:py_list_to_gobj_list`. This file also contains classes that represent materials (`Medium`) and susceptibilities, and cartesian/reciprocal/lattice conversion functions. Note that when adding a class or function to this file, it must also be imported in the `%pythoncode` block at the end of `python/meep.i` if you want it to be directly accessible from the `meep` namespace (i.e., to get `meep.MyClass` instead of `meep.geom.MyClass`).
### `simulation.py`
Holds the `Simulation` class, which is the primary abstraction of the high-level interface. Minimally, a simulation script amounts to passing the desired keyword arguments to the `Simulation` constructor and calling the `run` method on the resulting instance. The various step functions are also included in this file. When adding extra functions or class to this file, an import statement should also be added to the `%pythoncode` block at the bottom of `python/meep.i`.
### `source.py`
Holds classes representing sources, including `GaussianSource`, `ContinuousSource`, `CustomSource`, and `EigenModeSource`. When adding extra functions or class to this file, an import statement should also be added to the `%pythoncode` block at the bottom of `python/meep.i`.
### `mpb.i`
SWIG interface file for the `meep.mpb` Python module.
### `solver.py`
Classes and functions related to the high-level Python interface to `MPB`. Additional classes or functions in this file should be accompanied by an `import` statement in the `%pythoncode` block at the bottom of `mpb.i`.
### `mpb_data.py`
Definition of `MPBData`, a Python class useful for `MPB` data analysis (documented [here](https://mpb.readthedocs.io/en/latest/Python_Data_Analysis_Tutorial)). This is is a Python port of the functionality available in the [`mpb-data` command line program](https://github.com/NanoComp/mpb/blob/master/utils/mpb-data.c) originally written in C.
## Development
By default, the SWIG Python bindings are built with `threads` disabled (GIL is
held for all SWIG wrapped python calls by default). You can optionally build the
Python bindings with `threads` enabled (releasing the GIL for all SWIG wrapped
Python calls) by passing the `--enable-swig-python-threads`
option to the configure script.
Since the bindings could be built with `threads` enabled, one needs to be
careful to protect (acquire the GIL) code that calls back into Python or custom
python wrapper code that uses PyAPI. Look for `SWIG_PYTHON_THREAD_SCOPED_BLOCK`
in the SWIG interface files or the custom wrapper code for how this is done.
## Testing
The tests for the Python interface are located in `python/tests`. To run the whole test suite, run `make check` in the `python` build tree. During development it is more convenient to run individual tests. This can be accomplished by running `python <path_to_test>/test.py MyTestCase.test_method`. See the [Python unittest framework documentation](https://docs.python.org/3/library/unittest.html) for more info.
The Makefile will set up a copy of the `meep` package in the build directory. Pointing `PYTHONPATH` at this package allows you to modify the files in `meep/python`, run `make`, and test the newly assembled package without installing it. If you're using an out-of-tree build (recommended), the development process will look something like this:
```bash
cd meep/build/python
export PYTHONPATH=`pwd`
# After making changes, rebuild the Python package
make
# Run test
python ../../python/tests/my_test.py MyNewTest.test_my_feature
```
## Creating a Release Tarball
Since the pymeep package version is based off of the Git version tag, it is important to tag the release in Github before running `make dist` to create the release tarball. You may also have to run `git fetch --tags`.
## Conda Packages
Binary conda packages for official releases of [libctl](https://github.com/conda-forge/libctl-feedstock), [MPB](https://github.com/conda-forge/mpb-feedstock), and [pymeep](https://github.com/conda-forge/pymeep-feedstock) are hosted on [conda-forge](https://conda-forge.org/docs/). Whenever a new release tarball is created and posted to GitHub, a conda-forge bot will automatically detect that an update is needed and open a pull request in the corresponding repository. The developer need only review and merge the pull request and a conda package of the newest release will automatically be posted to the `conda-forge` channel on [anaconda.org](https://anaconda.org/conda-forge/) within an hour or so.
The `conda-forge` "feedstocks" (or package repositories) all have a similar structure. The recipe for building the package itself is in a folder called `recipe`, and everything else in the repo is support code and configuration for the `conda-forge` infrastructure. When the bot creates an automated pull request, the only files the developer needs to review are those in the `recipe` directory. The rest of the changes are `conda-forge` automatically keeping its configuration up to date. The recipe consists mainly of the `meta.yaml` and `build.sh` files. A tool called [conda-build](https://docs.conda.io/projects/conda-build/en/latest/index.html) uses these files to create conda packages. `build.sh` contains the shell commands to build the project ([docs](https://docs.conda.io/projects/conda-build/en/latest/resources/build-scripts.html)) and `meta.yaml` defines the package version, specifies how to obtain the source code, and lists build and run dependencies ([docs](https://docs.conda.io/projects/conda-build/en/latest/resources/define-metadata.html)). Push access to the feedstocks is granted by adding a GitHub username to the `recipe-maintainers` tag in `meta.yaml`.
|
