1
2
3
4
5
6
7
8
9
10
11
12
13
14
15
16
17
18
19
20
21
22
23
24
25
26
27
28
29
30
31
32
33
34
35
36
37
38
39
40
41
42
43
44
45
46
47
48
49
50
51
52
53
54
55
56
57
|
Image Segmentation with Distance Transform and Watershed Algorithm {#tutorial_distance_transform}
=============
Goal
----
In this tutorial you will learn how to:
- Use the OpenCV function @ref cv::filter2D in order to perform some laplacian filtering for image sharpening
- Use the OpenCV function @ref cv::distanceTransform in order to obtain the derived representation of a binary image, where the value of each pixel is replaced by its distance to the nearest background pixel
- Use the OpenCV function @ref cv::watershed in order to isolate objects in the image from the background
Theory
------
Code
----
This tutorial code's is shown lines below. You can also download it from
[here](https://github.com/opencv/opencv/tree/master/samples/cpp/tutorial_code/ImgTrans/imageSegmentation.cpp).
@include samples/cpp/tutorial_code/ImgTrans/imageSegmentation.cpp
Explanation / Result
--------------------
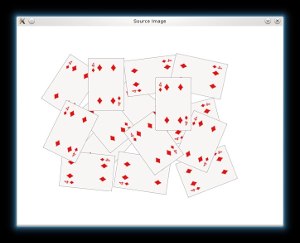
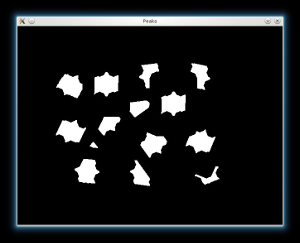
-# Load the source image and check if it is loaded without any problem, then show it:
@snippet samples/cpp/tutorial_code/ImgTrans/imageSegmentation.cpp load_image
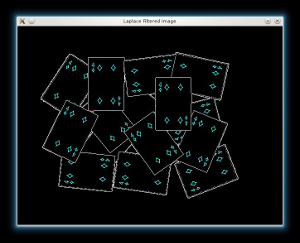
-# Then if we have an image with white background, it is good to tranform it black. This will help us to desciminate the foreground objects easier when we will apply the Distance Transform:
@snippet samples/cpp/tutorial_code/ImgTrans/imageSegmentation.cpp black_bg

-# Afterwards we will sharp our image in order to acute the edges of the foreground objects. We will apply a laplacian filter with a quite strong filter (an approximation of second derivative):
@snippet samples/cpp/tutorial_code/ImgTrans/imageSegmentation.cpp sharp

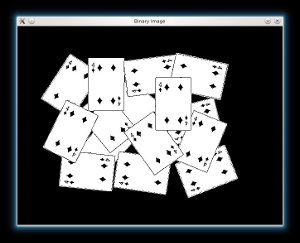
-# Now we tranfrom our new sharped source image to a grayscale and a binary one, respectively:
@snippet samples/cpp/tutorial_code/ImgTrans/imageSegmentation.cpp bin
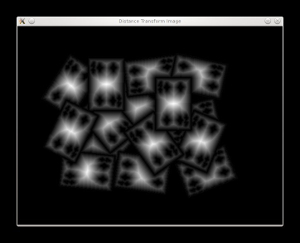
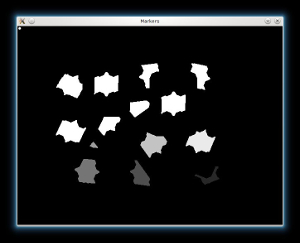
-# We are ready now to apply the Distance Tranform on the binary image. Moreover, we normalize the output image in order to be able visualize and threshold the result:
@snippet samples/cpp/tutorial_code/ImgTrans/imageSegmentation.cpp dist
-# We threshold the *dist* image and then perform some morphology operation (i.e. dilation) in order to extract the peaks from the above image:
@snippet samples/cpp/tutorial_code/ImgTrans/imageSegmentation.cpp peaks
-# From each blob then we create a seed/marker for the watershed algorithm with the help of the @ref cv::findContours function:
@snippet samples/cpp/tutorial_code/ImgTrans/imageSegmentation.cpp seeds
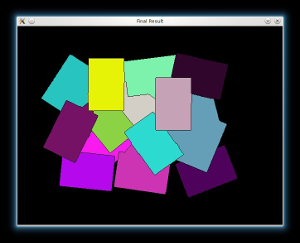
-# Finally, we can apply the watershed algorithm, and visualize the result:
@snippet samples/cpp/tutorial_code/ImgTrans/imageSegmentation.cpp watershed
|
