1
2
3
4
5
6
7
8
9
10
11
12
13
14
15
16
17
18
19
20
21
22
23
24
25
26
27
28
29
30
31
32
33
34
35
36
37
38
39
40
41
42
43
44
45
46
47
48
49
50
51
52
53
54
55
56
57
58
59
60
61
62
63
64
65
66
67
68
69
70
71
72
73
74
75
76
77
78
79
80
81
82
83
84
85
86
87
88
89
90
91
92
93
94
95
96
97
98
99
100
101
102
103
104
105
106
107
108
109
110
111
112
113
114
115
116
117
118
119
120
121
122
123
124
125
126
127
128
129
130
131
132
133
134
135
136
137
138
139
140
|
Image Pyramids {#tutorial_pyramids}
==============
Goal
----
In this tutorial you will learn how to:
- Use the OpenCV functions @ref cv::pyrUp and @ref cv::pyrDown to downsample or upsample a given
image.
Theory
------
@note The explanation below belongs to the book **Learning OpenCV** by Bradski and Kaehler.
- Usually we need to convert an image to a size different than its original. For this, there are
two possible options:
-# *Upsize* the image (zoom in) or
-# *Downsize* it (zoom out).
- Although there is a *geometric transformation* function in OpenCV that -literally- resize an
image (@ref cv::resize , which we will show in a future tutorial), in this section we analyze
first the use of **Image Pyramids**, which are widely applied in a huge range of vision
applications.
### Image Pyramid
- An image pyramid is a collection of images - all arising from a single original image - that are
successively downsampled until some desired stopping point is reached.
- There are two common kinds of image pyramids:
- **Gaussian pyramid:** Used to downsample images
- **Laplacian pyramid:** Used to reconstruct an upsampled image from an image lower in the
pyramid (with less resolution)
- In this tutorial we'll use the *Gaussian pyramid*.
#### Gaussian Pyramid
- Imagine the pyramid as a set of layers in which the higher the layer, the smaller the size.
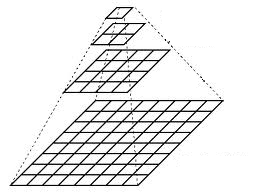
- Every layer is numbered from bottom to top, so layer \f$(i+1)\f$ (denoted as \f$G_{i+1}\f$ is smaller
than layer \f$i\f$ (\f$G_{i}\f$).
- To produce layer \f$(i+1)\f$ in the Gaussian pyramid, we do the following:
- Convolve \f$G_{i}\f$ with a Gaussian kernel:
\f[\frac{1}{16} \begin{bmatrix} 1 & 4 & 6 & 4 & 1 \\ 4 & 16 & 24 & 16 & 4 \\ 6 & 24 & 36 & 24 & 6 \\ 4 & 16 & 24 & 16 & 4 \\ 1 & 4 & 6 & 4 & 1 \end{bmatrix}\f]
- Remove every even-numbered row and column.
- You can easily notice that the resulting image will be exactly one-quarter the area of its
predecessor. Iterating this process on the input image \f$G_{0}\f$ (original image) produces the
entire pyramid.
- The procedure above was useful to downsample an image. What if we want to make it bigger?:
columns filled with zeros (\f$0\f$)
- First, upsize the image to twice the original in each dimension, wit the new even rows and
- Perform a convolution with the same kernel shown above (multiplied by 4) to approximate the
values of the "missing pixels"
- These two procedures (downsampling and upsampling as explained above) are implemented by the
OpenCV functions @ref cv::pyrUp and @ref cv::pyrDown , as we will see in an example with the
code below:
@note When we reduce the size of an image, we are actually *losing* information of the image.
Code
----
This tutorial code's is shown lines below. You can also download it from
[here](https://github.com/opencv/opencv/tree/master/samples/cpp/tutorial_code/ImgProc/Pyramids.cpp)
@include samples/cpp/tutorial_code/ImgProc/Pyramids.cpp
Explanation
-----------
Let's check the general structure of the program:
- Load an image (in this case it is defined in the program, the user does not have to enter it
as an argument)
@snippet cpp/tutorial_code/ImgProc/Pyramids.cpp load
- Create a Mat object to store the result of the operations (*dst*) and one to save temporal
results (*tmp*).
@code{.cpp}
Mat src, dst, tmp;
/* ... */
tmp = src;
dst = tmp;
@endcode
- Create a window to display the result
@snippet cpp/tutorial_code/ImgProc/Pyramids.cpp create_window
- Perform an infinite loop waiting for user input.
@snippet cpp/tutorial_code/ImgProc/Pyramids.cpp infinite_loop
Our program exits if the user presses *ESC*. Besides, it has two options:
- **Perform upsampling (after pressing 'u')**
@snippet cpp/tutorial_code/ImgProc/Pyramids.cpp pyrup
We use the function @ref cv::pyrUp with three arguments:
- *tmp*: The current image, it is initialized with the *src* original image.
- *dst*: The destination image (to be shown on screen, supposedly the double of the
input image)
- *Size( tmp.cols*2, tmp.rows\*2 )\* : The destination size. Since we are upsampling,
@ref cv::pyrUp expects a size double than the input image (in this case *tmp*).
- **Perform downsampling (after pressing 'd')**
@snippet cpp/tutorial_code/ImgProc/Pyramids.cpp pyrdown
Similarly as with @ref cv::pyrUp , we use the function @ref cv::pyrDown with three arguments:
- *tmp*: The current image, it is initialized with the *src* original image.
- *dst*: The destination image (to be shown on screen, supposedly half the input
image)
- *Size( tmp.cols/2, tmp.rows/2 )* : The destination size. Since we are upsampling,
@ref cv::pyrDown expects half the size the input image (in this case *tmp*).
- Notice that it is important that the input image can be divided by a factor of two (in
both dimensions). Otherwise, an error will be shown.
- Finally, we update the input image **tmp** with the current image displayed, so the
subsequent operations are performed on it.
@snippet cpp/tutorial_code/ImgProc/Pyramids.cpp update_tmp
Results
-------
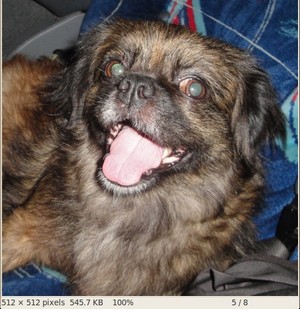
- After compiling the code above we can test it. The program calls an image **chicky_512.jpg**
that comes in the *samples/data* folder. Notice that this image is \f$512 \times 512\f$,
hence a downsample won't generate any error (\f$512 = 2^{9}\f$). The original image is shown below:
- First we apply two successive @ref cv::pyrDown operations by pressing 'd'. Our output is:
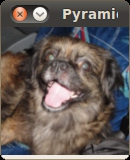
- Note that we should have lost some resolution due to the fact that we are diminishing the size
of the image. This is evident after we apply @ref cv::pyrUp twice (by pressing 'u'). Our output
is now:

|
