1
2
3
4
5
6
7
8
9
10
11
12
13
14
15
16
17
18
19
20
21
22
23
24
25
26
27
28
29
30
31
32
33
34
35
36
37
38
39
40
41
42
43
44
45
46
47
48
49
50
51
52
53
54
55
56
57
58
59
60
61
62
63
64
65
66
67
68
69
70
71
72
73
74
75
76
77
78
79
80
81
82
83
84
85
86
87
88
89
90
91
92
93
94
95
96
97
98
99
100
101
102
103
104
105
106
107
108
109
110
111
112
113
114
115
116
117
118
119
120
121
122
123
124
125
126
127
128
129
130
131
132
133
134
135
136
137
138
139
140
141
142
143
144
145
146
147
148
149
150
151
152
153
154
155
156
157
158
159
160
161
162
163
164
165
166
167
168
169
170
171
172
173
174
175
176
177
178
179
180
181
182
183
184
185
186
187
188
189
190
191
192
193
194
195
|
Introduction into Android Development {#tutorial_android_dev_intro}
=====================================
@prev_tutorial{tutorial_clojure_dev_intro}
@next_tutorial{tutorial_dev_with_OCV_on_Android}
| | |
| -: | :- |
| Original author | Rostislav Vasilikhin |
| Compatibility | OpenCV >= 4.0 |
This guide was designed to help you in learning Android development basics and setting up your
working environment quickly. It was tested with Ubuntu 22.04 and Windows 10.
If you encounter any error after thoroughly following these steps, feel free to contact us via
OpenCV [Forum](https://forum.opencv.org). We'll do our best to help you out.
Preface
-------
Android is a Linux-based, open source mobile operating system developed by Open Handset Alliance led
by Google. See the [Android home site](http://www.android.com/about/) for general details.
Development for Android significantly differs from development for other platforms. So before
starting programming for Android we recommend you make sure that you are familiar with the following
key topics:
-# [Java](http://en.wikipedia.org/wiki/Java_(programming_language)) programming language that is
the primary development technology for Android OS. Also, you can find [Oracle docs on
Java](http://docs.oracle.com/javase/) useful.
-# [Java Native Interface (JNI)](http://en.wikipedia.org/wiki/Java_Native_Interface) that is a
technology of running native code in Java virtual machine. Also, you can find [Oracle docs on
JNI](http://docs.oracle.com/javase/7/docs/technotes/guides/jni/) useful.
-# [Android
Activity](http://developer.android.com/training/basics/activity-lifecycle/starting.html) and its
life-cycle, that is an essential Android API class.
-# OpenCV development will certainly require some knowledge of the [Android
Camera](http://developer.android.com/guide/topics/media/camera.html) specifics.
Manual environment setup for Android development
------------------------------------------------
In this tutorial we're gonna use an official Android Studio IDE and a set of other freely available tools.
### Get tools and dependencies
Here's how to get a ready to work environment:
1. Download and install Android Studio:
* Ubuntu:
1. Download Android Studio: https://developer.android.com/studio
2. Extract the tar.gz archive
3. Follow the instructions in `Install-Linux-tar.txt`: open `android-studio/bin` folder in terminal and run `./studio.sh`
4. Perform standard installation through GUI
5. Optionally you can add a shortcut on a desktop for a quick access by clicking menu ***Tools -> Create desktop entry***. The menu appears after any project is created or opened.
* Windows:
Just download Android Studio from the official site and run installer.
2. Install fresh Android SDK and NDK:
1. Open SDK manager in Android Studio (***Customize -> All Settings -> Languages & Frameworks -> Android SDK***)
2. Enable "Show Package Details" checkbox

3. Check SDK and NDK of the latest versions and press OK
4. Make sure that your device support the chosen SDK versions
3. Install all the necessary packages for the build:
- `sudo apt install git cmake ninja-build openjdk-17-jdk openjdk-17-jre`
- the rest required packages are dependencies and should be installed automatically
### Check OpenCV examples
1. Download OpenCV from Android SDK from official [release page on Github](https://github.com/opencv/opencv/releases)
or [SourceForge](https://sourceforge.net/projects/opencvlibrary/).
2. Extract zip archive with your OS tools.
3. Open the project `<YOUR_OPENCV_BUILD_FOLDER>/OpenCV-android-sdk/samples` in Android Studio.
4. Connect your device
* Debugging should be enabled on a device, you can find an instruction about it across the web
* Alternatively you can use a virtual device that comes with the Android studio

5. Choose a sample from the drop-down menu (for example, `15-puzzle`) and run it.
Setup Device for Testing and Debugging
--------------------------------------
Usually the recipe above works as expected, but in some cases there are additional actions that must
be performed. In this section we'll cover some cases.
### Windows host computer
If you have Windows 10 or higher then you don't have to do additional actions to connect
a phone and run samples on it. However, earlier Windows versions require a longer procedure:
-# Enable USB debugging on the Android device (via Settings menu).
-# Attach the Android device to your PC with a USB cable.
-# Go to Start Menu and **right-click** on Computer. Select Manage in the context menu. You may be
asked for Administrative permissions.
-# Select Device Manager in the left pane and find an unknown device in the list. You may try
unplugging it and then plugging back in order to check whether it's your exact equipment appears
in the list.

-# Try your luck installing Google USB drivers without any modifications: **right-click** on the
unknown device, select Properties menu item --\> Details tab --\> Update Driver button.

-# Select Browse computer for driver software.

-# Specify the path to `<Android SDK folder>/extras/google/usb_driver/` folder.

-# If you get the prompt to install unverified drivers and report about success - you've finished
with USB driver installation.


-# Otherwise (getting the failure like shown below) follow the next steps.

-# Again **right-click** on the unknown device, select Properties --\> Details --\> Hardware Ids
and copy the line like `USB\VID_XXXX&PID_XXXX&MI_XX`.

-# Now open file `<Android SDK folder>/extras/google/usb_driver/android_winusb.inf`. Select either
Google.NTx86 or Google.NTamd64 section depending on your host system architecture.

-# There should be a record like existing ones for your device and you need to add one manually.

-# Save the `android_winusb.inf` file and try to install the USB driver again.


-# This time installation should go successfully.


-# And an unknown device is now recognized as an Android phone.
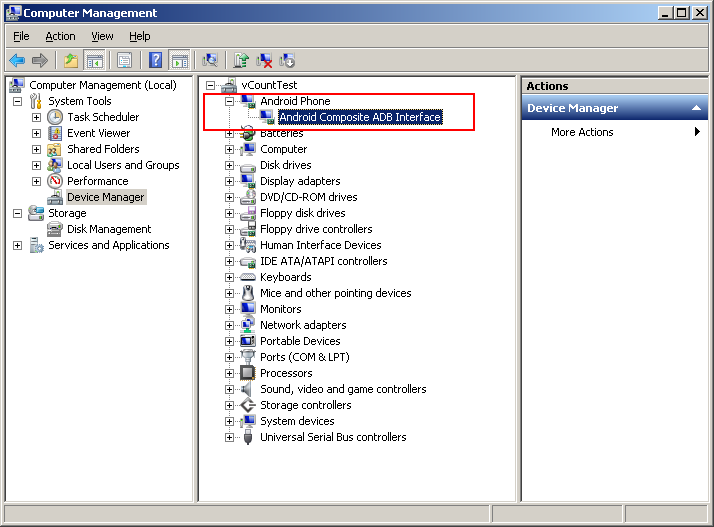
-# Successful device USB connection can be verified in console via adb devices command.

-# Now, in Eclipse go Run -\> Run/Debug to run your application in regular or debugging mode.
Device Chooser will let you choose among the devices.
### Linux host computer
While the latest Ubuntu versions work well with connected Android devices, there can be issues on older versions.
However, most of them can be fixed easily. You have to create a new **/etc/udev/rules.d/51-android.rules** configuration file that contains
information about your Android device. You may find some Vendor ID's
[here](http://developer.android.com/tools/device.html#VendorIds) or execute lsusb command to view
VendorID of plugged Android device. Here is an example of such file for LG device:
@code{.guess}
SUBSYSTEM=="usb", ATTR{idVendor}=="1004", MODE="0666", GROUP="plugdev"
@endcode
Then restart your adb server (even better to restart the system), plug in your Android device and
execute adb devices command. You will see the list of attached devices:
```
savuor@rostislav-laptop:~/Android/Sdk/platform-tools$ ./adb devices
List of devices attached
R58MB40Q3VP device
savuor@rostislav-laptop:~/Android/Sdk/platform-tools$
```
### Mac OS host computer
No actions are required, just connect your device via USB and run adb devices to check connection.
What's next
-----------
Now, when you have your instance of OpenCV4Adroid SDK set up and configured, you may want to proceed
to using OpenCV in your own application. You can learn how to do that in a separate @ref tutorial_dev_with_OCV_on_Android tutorial.
|
