1
2
3
4
5
6
7
8
9
10
11
12
13
14
15
16
17
18
19
20
21
22
23
24
25
26
27
28
29
30
31
32
33
34
35
36
37
38
39
40
41
42
43
44
45
46
47
48
49
50
51
52
53
54
55
56
57
58
59
60
61
62
63
64
65
66
67
68
69
70
71
72
73
74
75
76
77
78
79
80
81
82
83
84
85
86
87
88
89
90
91
92
93
94
95
96
97
98
99
100
101
102
103
104
105
106
107
108
109
110
111
112
113
114
115
116
117
118
119
120
121
122
123
124
125
126
127
128
129
130
131
132
133
134
135
136
137
138
139
140
141
142
143
144
145
146
147
148
149
150
151
152
153
154
155
156
157
158
159
160
161
162
163
164
165
166
167
168
169
170
171
172
173
174
175
176
177
178
179
180
181
182
183
184
185
186
187
188
189
190
191
192
193
194
195
196
197
198
199
200
201
|
Remapping {#tutorial_remap}
=========
@tableofcontents
@prev_tutorial{tutorial_hough_circle}
@next_tutorial{tutorial_warp_affine}
| | |
| -: | :- |
| Original author | Ana Huamán |
| Compatibility | OpenCV >= 3.0 |
Goal
----
In this tutorial you will learn how to:
a. Use the OpenCV function @ref cv::remap to implement simple remapping routines.
Theory
------
### What is remapping?
- It is the process of taking pixels from one place in the image and locating them in another
position in a new image.
- To accomplish the mapping process, it might be necessary to do some interpolation for
non-integer pixel locations, since there will not always be a one-to-one-pixel correspondence
between source and destination images.
- We can express the remap for every pixel location \f$(x,y)\f$ as:
\f[g(x,y) = f ( h(x,y) )\f]
where \f$g()\f$ is the remapped image, \f$f()\f$ the source image and \f$h(x,y)\f$ is the mapping function
that operates on \f$(x,y)\f$.
- Let's think in a quick example. Imagine that we have an image \f$I\f$ and, say, we want to do a
remap such that:
\f[h(x,y) = (I.cols - x, y )\f]
What would happen? It is easily seen that the image would flip in the \f$x\f$ direction. For
instance, consider the input image:
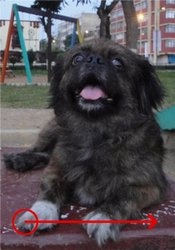
observe how the red circle changes positions with respect to x (considering \f$x\f$ the horizontal
direction):

- In OpenCV, the function @ref cv::remap offers a simple remapping implementation.
Code
----
- **What does this program do?**
- Loads an image
- Each second, apply 1 of 4 different remapping processes to the image and display them
indefinitely in a window.
- Wait for the user to exit the program
@add_toggle_cpp
- The tutorial code's is shown lines below. You can also download it from
[here](https://github.com/opencv/opencv/tree/4.x/samples/cpp/tutorial_code/ImgTrans/Remap_Demo.cpp)
@include samples/cpp/tutorial_code/ImgTrans/Remap_Demo.cpp
@end_toggle
@add_toggle_java
- The tutorial code's is shown lines below. You can also download it from
[here](https://github.com/opencv/opencv/tree/4.x/samples/java/tutorial_code/ImgTrans/remap/RemapDemo.java)
@include samples/java/tutorial_code/ImgTrans/remap/RemapDemo.java
@end_toggle
@add_toggle_python
- The tutorial code's is shown lines below. You can also download it from
[here](https://github.com/opencv/opencv/tree/4.x/samples/python/tutorial_code/ImgTrans/remap/Remap_Demo.py)
@include samples/python/tutorial_code/ImgTrans/remap/Remap_Demo.py
@end_toggle
Explanation
-----------
- Load an image:
@add_toggle_cpp
@snippet samples/cpp/tutorial_code/ImgTrans/Remap_Demo.cpp Load
@end_toggle
@add_toggle_java
@snippet samples/java/tutorial_code/ImgTrans/remap/RemapDemo.java Load
@end_toggle
@add_toggle_python
@snippet samples/python/tutorial_code/ImgTrans/remap/Remap_Demo.py Load
@end_toggle
- Create the destination image and the two mapping matrices (for x and y )
@add_toggle_cpp
@snippet samples/cpp/tutorial_code/ImgTrans/Remap_Demo.cpp Create
@end_toggle
@add_toggle_java
@snippet samples/java/tutorial_code/ImgTrans/remap/RemapDemo.java Create
@end_toggle
@add_toggle_python
@snippet samples/python/tutorial_code/ImgTrans/remap/Remap_Demo.py Create
@end_toggle
- Create a window to display results
@add_toggle_cpp
@snippet samples/cpp/tutorial_code/ImgTrans/Remap_Demo.cpp Window
@end_toggle
@add_toggle_java
@snippet samples/java/tutorial_code/ImgTrans/remap/RemapDemo.java Window
@end_toggle
@add_toggle_python
@snippet samples/python/tutorial_code/ImgTrans/remap/Remap_Demo.py Window
@end_toggle
- Establish a loop. Each 1000 ms we update our mapping matrices (*mat_x* and *mat_y*) and apply
them to our source image:
@add_toggle_cpp
@snippet samples/cpp/tutorial_code/ImgTrans/Remap_Demo.cpp Loop
@end_toggle
@add_toggle_java
@snippet samples/java/tutorial_code/ImgTrans/remap/RemapDemo.java Loop
@end_toggle
@add_toggle_python
@snippet samples/python/tutorial_code/ImgTrans/remap/Remap_Demo.py Loop
@end_toggle
- The function that applies the remapping is @ref cv::remap . We give the following arguments:
- **src**: Source image
- **dst**: Destination image of same size as *src*
- **map_x**: The mapping function in the x direction. It is equivalent to the first component
of \f$h(i,j)\f$
- **map_y**: Same as above, but in y direction. Note that *map_y* and *map_x* are both of
the same size as *src*
- **INTER_LINEAR**: The type of interpolation to use for non-integer pixels. This is by
default.
- **BORDER_CONSTANT**: Default
How do we update our mapping matrices *mat_x* and *mat_y*? Go on reading:
- **Updating the mapping matrices:** We are going to perform 4 different mappings:
-# Reduce the picture to half its size and will display it in the middle:
\f[h(i,j) = ( 2 \times i - src.cols/2 + 0.5, 2 \times j - src.rows/2 + 0.5)\f]
for all pairs \f$(i,j)\f$ such that: \f$\dfrac{src.cols}{4}<i<\dfrac{3 \cdot src.cols}{4}\f$ and
\f$\dfrac{src.rows}{4}<j<\dfrac{3 \cdot src.rows}{4}\f$
-# Turn the image upside down: \f$h( i, j ) = (i, src.rows - j)\f$
-# Reflect the image from left to right: \f$h(i,j) = ( src.cols - i, j )\f$
-# Combination of b and c: \f$h(i,j) = ( src.cols - i, src.rows - j )\f$
This is expressed in the following snippet. Here, *map_x* represents the first coordinate of
*h(i,j)* and *map_y* the second coordinate.
@add_toggle_cpp
@snippet samples/cpp/tutorial_code/ImgTrans/Remap_Demo.cpp Update
@end_toggle
@add_toggle_java
@snippet samples/java/tutorial_code/ImgTrans/remap/RemapDemo.java Update
@end_toggle
@add_toggle_python
@snippet samples/python/tutorial_code/ImgTrans/remap/Remap_Demo.py Update
@end_toggle
Result
------
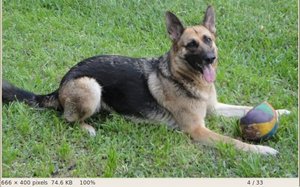
-# After compiling the code above, you can execute it giving as argument an image path. For
instance, by using the following image:
-# This is the result of reducing it to half the size and centering it:

-# Turning it upside down:
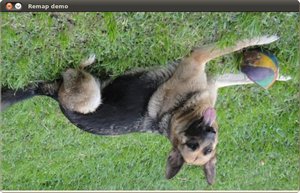
-# Reflecting it in the x direction:

-# Reflecting it in both directions:

|
