1
2
3
4
5
6
7
8
9
10
11
12
13
14
15
16
17
18
19
20
21
22
23
24
25
26
27
28
29
30
31
32
33
34
35
36
37
38
39
40
41
42
43
44
45
46
47
48
49
50
51
52
53
54
55
56
57
58
59
60
61
62
63
64
65
66
67
68
69
70
71
72
73
74
75
76
77
78
79
80
81
82
83
84
85
86
87
88
89
90
91
92
93
94
95
96
97
98
99
100
101
102
103
104
105
106
107
108
109
110
111
112
113
114
115
116
117
118
119
120
121
122
123
124
125
126
127
128
129
130
131
132
133
134
135
136
137
138
139
140
141
142
143
144
145
146
147
148
149
150
151
152
153
154
155
156
157
158
159
160
161
162
163
164
165
166
167
168
169
170
171
172
173
174
175
176
177
178
179
180
181
182
183
184
185
186
187
188
189
190
191
192
193
194
195
196
197
198
199
200
201
202
203
204
205
206
207
208
209
210
211
212
213
214
215
216
217
218
219
220
221
222
223
224
225
226
227
228
229
230
231
232
233
234
235
236
237
238
239
240
241
242
243
244
245
246
247
248
249
250
251
252
253
254
255
256
257
258
259
260
261
262
263
264
265
266
267
268
269
270
271
272
273
274
275
276
277
278
279
280
281
282
283
284
285
286
287
288
289
290
291
292
293
294
295
296
297
298
299
300
301
302
303
304
305
306
307
308
309
310
311
312
313
314
315
316
317
318
319
320
321
322
323
324
325
326
327
328
329
330
331
332
333
334
335
336
337
338
339
340
341
342
343
344
345
346
347
348
349
350
351
352
353
354
355
356
357
358
359
360
361
362
363
364
365
366
367
368
369
370
371
372
373
374
375
376
377
378
379
380
381
382
383
384
385
386
387
388
389
390
391
392
393
394
395
396
397
398
399
400
401
402
403
404
405
406
407
408
409
410
411
412
413
414
415
416
417
418
419
420
421
422
423
424
425
426
427
428
429
430
431
432
433
434
435
436
437
438
439
440
441
442
443
444
445
446
447
448
449
450
451
452
453
454
455
456
457
458
459
460
461
462
463
464
465
466
467
468
469
470
471
472
473
474
475
476
477
478
479
480
481
482
483
484
485
486
487
488
489
490
491
492
493
494
495
496
497
498
499
500
501
502
503
504
505
506
507
508
509
510
511
512
513
514
515
516
517
518
519
520
521
522
523
524
525
526
527
528
529
530
531
532
533
534
535
536
537
538
539
540
541
542
543
544
545
546
547
548
549
550
551
552
553
554
555
556
557
558
559
560
561
562
563
564
565
566
567
568
569
570
571
572
573
574
575
576
577
578
579
580
581
582
583
584
585
586
587
588
589
590
591
592
593
594
595
596
597
598
599
600
601
602
603
604
605
606
607
608
609
610
611
612
613
614
615
616
617
618
619
620
621
622
623
624
625
626
627
628
629
630
631
632
633
634
635
636
637
638
639
640
641
642
643
644
645
646
647
648
649
650
651
652
653
654
655
656
657
658
659
660
661
662
663
664
665
666
667
668
669
670
671
672
673
674
675
676
677
678
679
680
681
682
683
684
685
686
687
688
689
690
691
692
693
694
695
|
Writing documentation for OpenCV {#tutorial_documentation}
================================
@prev_tutorial{tutorial_display_image}
@next_tutorial{tutorial_transition_guide}
| | |
| -: | :- |
| Original author | Maksim Shabunin |
| Compatibility | OpenCV >= 3.0 |
@tableofcontents
Doxygen overview {#tutorial_documentation_overview}
================
Intro {#tutorial_documentation_intro}
-----
[Doxygen] is documentation generation system with a lot of great features, such as:
- parse program sources to produce actual and accurate documentation
- check documentation for errors
- insert images and formulas
- use markdown syntax and plain HTML for precise text formatting
- generate documentation in many different formats
OpenCV library existing documentation has been converted to doxygen format.
Installation {#tutorial_documentation_install}
------------
Please, check official [download][Doxygen download] and [installation][Doxygen installation] pages.
Some linux distributions can also provide doxygen packages.
Generate documentation {#tutorial_documentation_generate}
----------------------
- Get the OpenCV sources (version 3.0 and later)
- _Optional:_ get the OpenCV_contrib sources
- Create build directory near the sources folder(s) and go into it
- Run cmake (assuming you put sources to _opencv_ folder):
@code{.sh}
cmake -DBUILD_DOCS=ON ../opencv
@endcode
Or if you get contrib sources too:
@code{.sh}
cmake -DBUILD_DOCS=ON -DOPENCV_EXTRA_MODULES_PATH=../opencv_contrib/modules ../opencv
@endcode
- Run make:
@code{.sh}
make doxygen
@endcode
- Open <i>doc/doxygen/html/index.html</i> file in your favorite browser
- Test your Python code:
@code{.sh}
make check_pylint
@endcode
@note [Pylint](https://www.pylint.org/#install) must be installed before running cmake to be
able to test Python code. You can install using your system's package manager, or with pip:
@code{.sh} pip install pylint @endcode
Quick start {#tutorial_documentation_quick_start}
===========
@note These instructions are specific to OpenCV library documentation, other projects can use
different layout scheme and documenting agreements.
Documentation locations {#tutorial_documentation_quick_start_1}
-----------------------
Whole documentation is gathered from many different places:
- __source code__ entities, like classes, functions or enumerations, should be documented in
corresponding header files, right prior entity definition. See examples in next sections.
- __pages__ are good place to put big pieces of text with images and code examples not directly
connected with any source code entity. Pages should be located in separate files and
contained in several predefined places. This tutorial is example of such page.
- __images__ can be used to illustrate described things. Usually located at the same places as pages,
images can be inserted to any place of the documentation.
- __code examples__ show how to use the library in real applications. Each sample is
self-contained file which represents one simple application. Parts of these files can be
included into documentation and tutorials to demonstrate function calls and objects collaboration.
- __BibTeX references__ are used to create one common bibliography. All science books, articles and
proceedings served as basis for library functionality should be put in this reference list.
Following scheme represents common documentation places for _opencv_ repository:
~~~
<opencv>
├── doc - doxygen config files, root page (root.markdown.in), BibTeX file (opencv.bib)
│ ├── tutorials - tutorials hierarchy (pages and images)
│ └── py_tutorials - python tutorials hierarchy (pages and images)
├── modules
│ └── <modulename>
│ ├── doc - documentation pages and images for module
│ └── include - code documentation in header files
└── samples - place for all code examples
├── cpp
│ └── tutorial_code - place for tutorial code examples
└── ...
~~~
@note Automatic code parser looks for all header files (<i>".h, .hpp"</i> except for <i>".inl.hpp;
.impl.hpp; _detail.hpp"</i>) in _include_ folder and its subfolders. Some module-specific
instructions (group definitions) and documentation should be put into
<i>"include/opencv2/<module-name>.hpp"</i> file.
@note You can put C++ template implementation and specialization to separate files
(<i>".impl.hpp"</i>) ignored by doxygen.
@note Files in _src_ subfolder are not parsed, because documentation is intended mostly for the
library users, not developers. But it still is possible to generate full documentation by
customizing processed files list in cmake script (<i>doc/CMakeLists.txt</i>) and doxygen options in
its configuration file (<i>doc/Doxyfile.in</i>).
Since version 3.0 all new modules are placed into _opencv_contrib_ repository, it has slightly
different layout:
~~~
<opencv_contrib>
└── modules
└── <modulename>
├── doc - documentation pages and images, BibTeX file (<modulename>.bib)
├── include - code documentation in header files
├── samples - place for code examples for documentation and tutorials
└── tutorials - tutorial pages and images
~~~
Example {#tutorial_documentation_quick_start_2}
-------
To add documentation for functions, classes and other entities, just insert special comment prior
its definition. Like this:
@verbatim
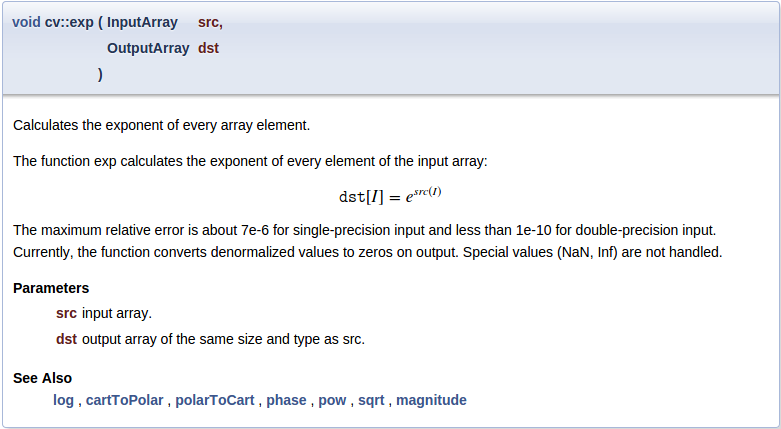
/** @brief Calculates the exponent of every array element.
The function exp calculates the exponent of every element of the input array:
\f[ \texttt{dst} [I] = e^{ src(I) } \f]
The maximum relative error is about 7e-6 for single-precision input and less than 1e-10 for
double-precision input. Currently, the function converts denormalized values to zeros on output.
Special values (NaN, Inf) are not handled.
@param src input array.
@param dst output array of the same size and type as src.
@sa log , cartToPolar , polarToCart , phase , pow , sqrt , magnitude
*/
CV_EXPORTS_W void exp(InputArray src, OutputArray dst);
@endverbatim
Here you can see:
- special C-comment syntax denotes it is doxygen comment
@verbatim /** ... */ @endverbatim
- command `brief` denotes following paragraph is a brief description
@verbatim @brief @endverbatim
- empty line denotes paragraph end
- TeX formula between `f[` and `f]` commands
@verbatim \f[ ... \f] @endverbatim
- command `param` denotes following word is name of the parameter and following text is
description of the parameter; all parameters are placed in a list
@verbatim @param @endverbatim
- command `sa` starts "See also" paragraph containing references to some classes, methods, pages or URLs.
@verbatim @sa @endverbatim
Produced reference item looks like this:

The "More..." link brings you to the function documentation:
Another example {#tutorial_documentation_quick_start_3}
---------------
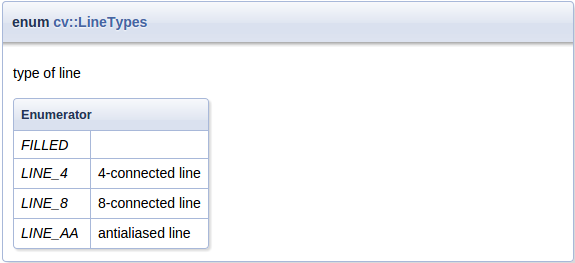
Different comment syntax can be used for one-line short comments:
@verbatim
//! type of line
enum LineTypes {
FILLED = -1,
LINE_4 = 4, //!< 4-connected line
LINE_8 = 8, //!< 8-connected line
LINE_AA = 16 //!< antialiased line
};
@endverbatim
Here:
- special C++-comment syntax denotes it is doxygen comment
@verbatim //! @endverbatim
- additional symbol `<` denotes this comment is located _after_ documented entity
@verbatim //!< @endverbatim
Produced documentation block looks like this:
More details {#tutorial_documentation_quick_start_4}
------------
### Command prefix
Doxygen commands starts with `@` or `\` sign:
@verbatim
@brief ...
or
\brief ...
@endverbatim
### Comment syntax
Doxygen comment can have different forms:
@verbatim
C-style:
/** ... */
or
/*! ... */
C++-style
//! ...
or
/// ...
Lines can start with '*':
/**
* ...
* ...
*/
Can be placed after documented entity:
//!< ...
/**< ... */
@endverbatim
### Paragraph end
To end paragraph, insert empty line or any command starting new paragraph:
@verbatim
@brief brief description paragraph
brief continues
new paragraph
@note new note paragraph
note paragraph continues
another paragraph
paragraph continues
@endverbatim
### Naming
Pages, anchors, groups and other named entities should have unique name inside the whole project.
It is a good idea to prefix such identifiers with module name:
@verbatim
@page core_explanation_1 Usage explanation
@defgroup imgproc_transform Image transformations
@anchor mymodule_interesting_note
@endverbatim
Supported Markdown {#tutorial_documentation_quick_start_md}
------------------
Doxygen supports Markdown formatting with some extensions. Short syntax reference is described
below, for details visit [Markdown support].
### lists {#tutorial_documentation_md_list}
@verbatim
Bulleted:
- item1
- item2
Numbered:
1. item1
2. item2
or
-# item1
-# item2
@endverbatim
### emphasis {#tutorial_documentation_md_emph}
@verbatim
_italic_
__bold__
use html in complex cases:
<em>"path/to/file"</em>
@endverbatim
### links {#tutorial_documentation_md_links}
@verbatim
explicit link:
[OpenCV main site](http://opencv.org)
automatic links:
<http://opencv.org>
or even:
http://opencv.org
@endverbatim
### images {#tutorial_documentation_md_image}
@verbatim

@endverbatim
### headers {#tutorial_documentation_md_head}
@verbatim
Level1
======
Level2
------
### Level3
#### Level4
@endverbatim
### header id {#tutorial_documentation_md_headid}
You can assign a unique identifier to any header to reference it from other places.
@verbatim
Header {#some_unique_identifier}
------
...
See @ref some_unique_identifier for details
@endverbatim
### page id {#tutorial_documentation_md_page}
Each page should have additional Level1 header at the beginning with page title and identifier:
@verbatim
Writing documentation for OpenCV {#tutorial_documentation}
================================
@endverbatim
### tables {#tutorial_documentation_md_table}
Example from doxygen documentation:
@verbatim
First Header | Second Header
------------- | -------------
Content Cell | Content Cell
Content Cell | Content Cell
@endverbatim
Commonly used commands {#tutorial_documentation_quick_start_5}
----------------------
Most often used doxygen commands are described here with short examples. For the full list of
available commands and detailed description, please visit [Command reference].
### Basic commands {#tutorial_documentation_commands_basic}
- __brief__ - paragraph with brief entity description
- __param__ - description of function argument.
Multiple adjacent statements are merged into one list. If argument with this name is not found
in actual function signature - doxygen warning will be produced. Function can have either _no_
documented parameters, either _all_ should be documented.
- __sa__ - "See also" paragraph, contains references to classes, functions, pages or URLs
- __note__ - visually highlighted "Note" paragraph. Multiple adjacent statements are merged into
one block.
- __return, returns__ - describes returned value of a function
- __overload__ - adds fixed text to the function description: <em>"This is an overloaded member
function, provided for convenience. It differs from the above function only in what argument(s)
it accepts."</em>
- __anchor__ - places invisible named anchor, which can be referenced by `ref` command. It can be
used in pages only.
- __ref__ - explicit reference to a named section, page or anchor.
If such entity can not be found - doxygen warning will be generated. This command has an
optional argument - link text.
Doxygen also generates some links automatically: if text contains word which can be found in
documented entities - reference will be generated. This functionality can be disabled by prefixing
the word with `%` symbol.
@verbatim
Explicit reference: @ref MyClass
Explicit named reference: @ref example_page "Example page"
Implicit reference: cv::abc::MyClass1 or just MyClass1
Disable implicit reference: %MyClass1
@endverbatim
- __f__ - formula
Inline formulas are bounded with `f$` command:
@verbatim
\f$ ... \f$
@endverbatim
Block formulas - with `f[` and `f]` commands:
@verbatim
\f[ ... \f]
@endverbatim
### Code inclusion commands {#tutorial_documentation_commands_include}
To mark some text as a code in documentation, _code_ and _endcode_ commands are used.
@verbatim
@code
float val = img.at<float>(borderInterpolate(100, img.rows, cv::BORDER_REFLECT_101),
borderInterpolate(-5, img.cols, cv::BORDER_WRAP));
@endcode
@endverbatim
Syntax will be highlighted according to the currently parsed file type (C++ for <em>.hpp</em>, C for <em>.h</em>) or
you can manually specify it in curly braces:
@verbatim
@code{.xml}
@endverbatim
To include whole example file into documentation, _include_ and _includelineno_ commands are used.
The file is searched in common samples locations, so you can specify just its name or short part of
the path. The _includelineno_ version also shows line numbers but prevents copy-pasting since
the line numbers are included.
@verbatim
@include samples/cpp/test.cpp
@endverbatim
If you want to include some parts of existing example file - use _snippet_ command.
First, mark the needed parts of the file with special doxygen comments:
@verbatim
//! [var_init]
int a = 0;
//! [var_init]
@endverbatim
Then include this snippet into documentation:
@verbatim
@snippet samples/cpp/test.cpp var_init
@endverbatim
@note Currently most of such partial inclusions are made with _dontinclude_ command for
compatibility with the old rST documentation. But newly created samples should be included with the
_snippet_ command, since this method is less affected by the changes in processed file.
### Toggle buttons inclusion commands {#tutorial_documentation_toggle_buttons_commands_include}
Toggle buttons are used to display the selected configuration (e.g. programming language, OS, IDE).
To use the buttons in documentation, _add_toggle_ and _end_toggle_ commands are used.
The command _add_toggle_ can be
- general: _add_toggle{Button Name}_
- for C++: _add_toggle_cpp_
- for Java: _add_toggle_java_
- for Python: _add_toggle_python_
Example:
@verbatim
@add_toggle{Button Name}
text / code / doxygen commands
@end_toggle
@endverbatim
For example using toggle buttons with text and [code](@ref tutorial_documentation_commands_include) snippets:
@verbatim
### Buttons Example
@add_toggle_cpp
Text for C++ button
@snippet samples/cpp/tutorial_code/introduction/documentation/documentation.cpp hello_world
@end_toggle
@add_toggle_java
Text for Java button
@snippet samples/java/tutorial_code/introduction/documentation/Documentation.java hello_world
@end_toggle
@add_toggle_python
Text for Python button
@snippet samples/python/tutorial_code/introduction/documentation/documentation.py hello_world
@end_toggle
@endverbatim
Result looks like this:
### Buttons Example
@add_toggle_cpp
Text for C++ button
@snippet samples/cpp/tutorial_code/introduction/documentation/documentation.cpp hello_world
@end_toggle
@add_toggle_java
Text for Java button
@snippet samples/java/tutorial_code/introduction/documentation/Documentation.java hello_world
@end_toggle
@add_toggle_python
Text for Python button
@snippet samples/python/tutorial_code/introduction/documentation/documentation.py hello_world
@end_toggle
As you can see, the buttons are added automatically under the previous heading.
### Grouping commands {#tutorial_documentation_commands_group}
All code entities should be put into named groups representing OpenCV modules and their internal
structure, thus each module should be associated with a group with the same name. Good place to
define groups and subgroups is the main header file for this module:
<em>"<module>/include/opencv2/<module>.hpp"</em>.
@note Doxygen groups are called "modules" and are shown on "Modules" page.
@verbatim
/**
@defgroup mymodule My great module
optional description
@{
@defgroup mymodule_basic Basic operations
optional description
@defgroup mymodule_experimental Experimental operations
optional description
@}
*/
@endverbatim
To put classes and functions into specific group, just add `ingroup` command to its documentation,
or wrap the whole code block with `addtogroup` command:
@verbatim
/** @brief Example function
@ingroup mymodule
*/
or
/**
@addtogroup mymodule_experimental
@{
*/
... several functions, classes or enumerations here
/**
@}
*/
@endverbatim
### Publication reference {#tutorial_documentation_commands_cite}
Use _cite_ command to insert reference to related publications listed in @ref citelist page.
First, add publication BibTeX record into <i>"<opencv>/doc/opencv.bib"</i> or
<i>"<opencv_contrib>/modules/<module>/doc/<module>.bib"</i> file:
@verbatim
@ARTICLE{Bradski98,
author = {Bradski, Gary R},
title = {Computer vision face tracking for use in a perceptual user interface},
year = {1998},
publisher = {Citeseer}
}
@endverbatim
@note Try not to add publication duplicates because it can confuse documentation readers and writers later.
Then make reference with _cite_ command:
@verbatim
@cite Bradski98
@endverbatim
@note To get BibTeX record for the publications one can use [Google Scholar]. Once the publication
have been found - follow its "Cite" link and then choose "BibTeX" option:

Step-by-step {#tutorial_documentation_steps}
============
Steps described in this section can be used as checklist during documentation writing. It is not
necessary to do things in the same order, but some steps really depend on previous. And of course
these steps are just basic guidelines, there is always a place for creativity.
Document the function {#tutorial_documentation_steps_fun}
---------------------
1. Add empty doxygen comment preceding function definition.
2. Add _brief_ command with short description of function meaning at the beginning.
3. Add detailed description of the function.
4. _Optional_: insert formulas, images and blocks of example code to illustrate complex cases
5. _Optional_: describe each parameter using the _param_ command.
6. _Optional_: describe return value of the function using the _returns_ command.
7. _Optional_: add "See also" section with links to similar functions or classes
8. _Optional_: add bibliographic reference if any.
9. Test your code. (Python: "make check_pylint")
10. Generate doxygen documentation and verify results.
Write the tutorial {#tutorial_documentation_steps_tutorial}
------------------
1. Formulate the idea to be illustrated in the tutorial.
2. Make the example application, simple enough to be understood by a beginning developer. Be
laconic and write descriptive comments, don't try to avoid every possible runtime error or to make
universal utility. Your goal is to illustrate the idea. And it should fit one source file!
If you want to insert code blocks from this file into your tutorial, mark them with special doxygen comments (see [here](@ref tutorial_documentation_commands_include)).
If you want to write the tutorial in more than one programming language, use the toggle buttons for alternative comments and code (see [here](@ref tutorial_documentation_toggle_buttons_commands_include)).
3. Collect results of the application work. It can be "before/after" images or some numbers
representing performance or even a video.
Save it in appropriate format for later use in the tutorial:
- To save simple graph-like images use lossless ".png" format.
- For photo-like images - lossy ".jpg" format.
- Numbers will be inserted as plain text, possibly formatted as table.
- Video should be uploaded on YouTube.
4. Create new tutorial page (<em>".markdown"</em>-file) in corresponding location (see
[here](@ref tutorial_documentation_quick_start_1)), and place all image files near it (or in "images"
subdirectory). Also put your example application file and make sure it is compiled together with the
OpenCV library when `-DBUILD_EXAMPLES=ON` option is enabled on cmake step.
5. Modify your new page:
- Add page title and identifier, usually prefixed with <em>"tutorial_"</em> (see [here](@ref tutorial_documentation_md_page)).
You can add a link to the previous and next tutorial using the identifier
@verbatim
@prev_tutorial{identifier}
@next_tutorial{identifier}
@endverbatim
@warning Do **not** write the **hashtag (#)**, example: \n Incorrect: @verbatim @prev_tutorial{#tutorial_documentation} @endverbatim Correct: @verbatim @prev_tutorial{tutorial_documentation} @endverbatim
- Add brief description of your idea and tutorial goals.
- Describe your program and/or its interesting pieces.
- Describe your results, insert previously added images or other results.
To add a youtube video, e.g. www.youtube.com/watch?v= **ViPN810E0SU**, use _youtube_{**Video ID**}:
@verbatim
@youtube{ViPN810E0SU}
@endverbatim
- Add bibliographic references if any (see [here](@ref tutorial_documentation_commands_cite)).
6. Add newly created tutorial to the corresponding table of contents. Just find
<em>"table_of_content_*.markdown"</em> file with the needed table and place new record in it
similar to existing ones.
It is simply a list item with special _subpage_ command which marks your page as a
child and places it into the existing pages hierarchy. Also note the list item indent, empty lines between
paragraphs and special _italic_ markers.
7. Generate doxygen documentation and verify results.
References {#tutorial_documentation_refs}
==========
- [Doxygen] - main Doxygen page
- [Documenting basics] - how to include documentation in code
- [Markdown support] - supported syntax and extensions
- [Formulas support] - how to include formulas
- [Supported formula commands] - HTML formulas use MathJax script for rendering
- [Command reference] - supported commands and their parameters
<!-- invisible references list -->
[Doxygen]: http://www.doxygen.nl
[Doxygen download]: http://doxygen.nl/download.html
[Doxygen installation]: http://doxygen.nl/manual/install.html
[Documenting basics]: http://www.doxygen.nl/manual/docblocks.html
[Markdown support]: http://www.doxygen.nl/manual/markdown.html
[Formulas support]: http://www.doxygen.nl/manual/formulas.html
[Supported formula commands]: http://docs.mathjax.org/en/latest/input/tex/macros/index.html
[Command reference]: http://www.doxygen.nl/manual/commands.html
[Google Scholar]: http://scholar.google.ru/
|
