1
2
3
4
5
6
7
8
9
10
11
12
13
14
15
16
17
18
19
20
21
22
23
24
25
26
27
28
29
30
31
32
33
34
35
36
37
38
39
40
41
42
43
44
45
46
47
48
49
50
51
52
53
54
55
56
57
58
59
60
61
62
63
64
65
66
67
68
69
70
71
72
73
74
75
76
77
78
79
80
81
82
83
84
85
86
87
88
89
90
91
92
93
94
95
96
97
98
99
100
101
102
103
104
105
106
107
108
109
110
111
112
113
114
115
116
117
118
119
120
121
122
123
124
125
126
127
128
129
130
131
132
133
134
135
136
137
138
139
140
141
142
143
144
145
146
147
148
149
150
151
152
153
154
155
156
157
158
159
160
161
162
163
164
165
166
167
168
169
170
171
172
173
174
175
176
177
178
179
180
181
182
183
184
185
186
187
188
189
190
191
192
193
194
195
196
197
198
199
200
201
202
203
204
205
206
207
208
209
210
211
212
213
214
215
|
OpenCV iOS - Video Processing {#tutorial_video_processing}
=============================
@tableofcontents
@prev_tutorial{tutorial_image_manipulation}
| | |
| -: | :- |
| Original author | Eduard Feicho |
| Compatibility | OpenCV >= 3.0 |
This tutorial explains how to process video frames using the iPhone's camera and OpenCV.
Prerequisites:
--------------
- Xcode 4.3 or higher
- Basic knowledge of iOS programming (Objective-C, Interface Builder)
Including OpenCV library in your iOS project
--------------------------------------------
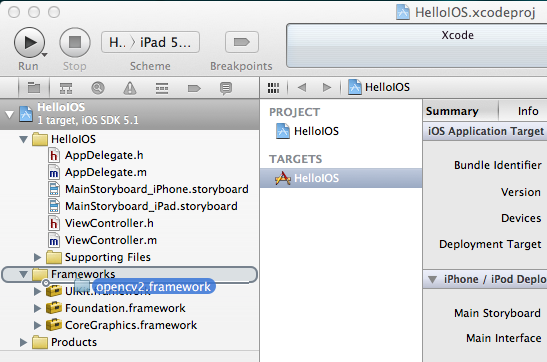
The OpenCV library comes as a so-called framework, which you can directly drag-and-drop into your
XCode project. Download the latest binary from
<http://sourceforge.net/projects/opencvlibrary/files/opencv-ios/>. Alternatively follow this
guide @ref tutorial_ios_install to compile the framework manually. Once you have the framework, just
drag-and-drop into XCode:
Also you have to locate the prefix header that is used for all header files in the project. The file
is typically located at "ProjectName/Supporting Files/ProjectName-Prefix.pch". There, you have add
an include statement to import the opencv library. However, make sure you include opencv before you
include UIKit and Foundation, because else you will get some weird compile errors that some macros
like min and max are defined multiple times. For example the prefix header could look like the
following:
@code{.objc}
//
// Prefix header for all source files of the 'VideoFilters' target in the 'VideoFilters' project
//
#import <Availability.h>
#ifndef __IPHONE_4_0
#warning "This project uses features only available in iOS SDK 4.0 and later."
#endif
#ifdef __cplusplus
#import <opencv2/opencv.hpp>
#endif
#ifdef __OBJC__
#import <UIKit/UIKit.h>
#import <Foundation/Foundation.h>
#endif
@endcode
### Example video frame processing project
#### User Interface
First, we create a simple iOS project, for example Single View Application. Then, we create and add
an UIImageView and UIButton to start the camera and display the video frames. The storyboard could
look like that:

Make sure to add and connect the IBOutlets and IBActions to the corresponding ViewController:
@code{.objc}
@interface ViewController : UIViewController
{
IBOutlet UIImageView* imageView;
IBOutlet UIButton* button;
}
- (IBAction)actionStart:(id)sender;
@end
@endcode
#### Adding the Camera
We add a camera controller to the view controller and initialize it when the view has loaded:
@code{.objc}
#import <opencv2/videoio/cap_ios.h>
using namespace cv;
@interface ViewController : UIViewController
{
...
CvVideoCamera* videoCamera;
}
...
@property (nonatomic, retain) CvVideoCamera* videoCamera;
@end
@endcode
@code{.objc}
- (void)viewDidLoad
{
[super viewDidLoad];
// Do any additional setup after loading the view, typically from a nib.
self.videoCamera = [[CvVideoCamera alloc] initWithParentView:imageView];
self.videoCamera.defaultAVCaptureDevicePosition = AVCaptureDevicePositionFront;
self.videoCamera.defaultAVCaptureSessionPreset = AVCaptureSessionPreset352x288;
self.videoCamera.defaultAVCaptureVideoOrientation = AVCaptureVideoOrientationPortrait;
self.videoCamera.defaultFPS = 30;
self.videoCamera.grayscale = NO;
}
@endcode
In this case, we initialize the camera and provide the imageView as a target for rendering each
frame. CvVideoCamera is basically a wrapper around AVFoundation, so we provide as properties some of
the AVFoundation camera options. For example we want to use the front camera, set the video size to
352x288 and a video orientation (the video camera normally outputs in landscape mode, which results
in transposed data when you design a portrait application).
The property defaultFPS sets the FPS of the camera. If the processing is less fast than the desired
FPS, frames are automatically dropped.
The property grayscale=YES results in a different colorspace, namely "YUV (YpCbCr 4:2:0)", while
grayscale=NO will output 32 bit BGRA.
Additionally, we have to manually add framework dependencies of the opencv framework. Finally, you
should have at least the following frameworks in your project:
- opencv2
- Accelerate
- AssetsLibrary
- AVFoundation
- CoreGraphics
- CoreImage
- CoreMedia
- CoreVideo
- QuartzCore
- UIKit
- Foundation

#### Processing frames
We follow the delegation pattern, which is very common in iOS, to provide access to each camera
frame. Basically, the View Controller has to implement the CvVideoCameraDelegate protocol and has to
be set as delegate to the video camera:
@code{.objc}
@interface ViewController : UIViewController<CvVideoCameraDelegate>
@endcode
@code{.objc}
- (void)viewDidLoad
{
...
self.videoCamera = [[CvVideoCamera alloc] initWithParentView:imageView];
self.videoCamera.delegate = self;
...
}
@endcode
@code{.objc}
#pragma mark - Protocol CvVideoCameraDelegate
#ifdef __cplusplus
- (void)processImage:(Mat&)image;
{
// Do some OpenCV stuff with the image
}
#endif
@endcode
Note that we are using C++ here (cv::Mat). Important: You have to rename the view controller's
extension .m into .mm, so that the compiler compiles it under the assumption of Objective-C++
(Objective-C and C++ mixed). Then, __cplusplus is defined when the compiler is processing the file
for C++ code. Therefore, we put our code within a block where __cplusplus is defined.
#### Basic video processing
From here you can start processing video frames. For example the following snippet color-inverts the
image:
@code{.objc}
- (void)processImage:(Mat&)image;
{
// Do some OpenCV stuff with the image
Mat image_copy;
cvtColor(image, image_copy, COLOR_BGR2GRAY);
// invert image
bitwise_not(image_copy, image_copy);
//Convert BGR to BGRA (three channel to four channel)
Mat bgr;
cvtColor(image_copy, bgr, COLOR_GRAY2BGR);
cvtColor(bgr, image, COLOR_BGR2BGRA);
}
@endcode
#### Start!
Finally, we have to tell the camera to actually start/stop working. The following code will start
the camera when you press the button, assuming you connected the UI properly:
@code{.objc}
#pragma mark - UI Actions
- (IBAction)actionStart:(id)sender;
{
[self.videoCamera start];
}
@endcode
#### Hints
Try to avoid costly matrix copy operations as much as you can, especially if you are aiming for
real-time. As the image data is passed as reference, work in-place, if possible.
When you are working on grayscale data, turn set grayscale = YES as the YUV colorspace gives you
directly access the luminance plane.
The Accelerate framework provides some CPU-accelerated DSP filters, which come handy in your case.
|
