1
2
3
4
5
6
7
8
9
10
11
12
13
14
15
16
17
18
19
20
21
22
23
24
25
26
27
28
29
30
31
32
33
34
35
36
37
38
39
40
41
42
43
44
45
46
47
48
49
50
51
52
53
54
55
56
57
58
59
60
61
62
63
64
65
66
67
68
69
70
71
72
73
74
75
76
77
78
79
80
81
82
83
84
85
86
87
88
89
90
91
92
93
94
95
96
97
98
99
100
101
102
103
104
105
106
107
108
109
110
111
112
113
114
115
116
117
118
119
120
121
122
123
124
125
126
127
128
129
130
131
132
133
134
135
136
137
138
139
140
141
142
143
144
145
146
147
148
149
150
151
152
153
154
155
156
157
158
159
160
161
162
163
164
165
166
167
168
169
170
171
172
173
174
175
176
177
178
179
180
181
182
183
184
185
186
187
188
189
190
191
192
193
194
195
196
197
198
199
200
201
202
203
204
205
206
207
208
209
210
211
212
213
214
215
216
217
218
219
220
221
222
223
224
225
226
227
228
229
230
231
232
233
234
235
236
237
238
239
240
241
242
243
244
245
246
247
248
249
250
251
252
253
254
255
256
257
258
259
260
261
262
263
264
265
266
267
268
269
270
271
272
273
274
275
276
277
278
279
280
281
282
283
284
285
286
287
288
289
290
291
292
293
294
295
296
297
298
299
300
301
302
303
304
305
306
307
308
309
310
311
312
313
314
315
316
317
318
319
320
321
322
323
324
325
326
327
328
329
330
331
332
333
334
335
336
337
338
339
340
341
342
343
344
345
346
347
348
349
350
351
352
353
354
355
356
357
358
359
360
361
362
363
364
365
366
367
368
369
370
371
372
373
374
375
376
377
378
379
380
381
382
383
384
385
386
387
388
389
390
391
392
393
394
395
396
397
398
399
400
401
402
403
404
405
406
407
408
409
410
411
412
413
414
415
416
417
418
419
420
421
422
423
424
425
426
427
428
429
430
431
432
433
434
435
436
437
438
439
440
441
442
443
444
445
446
447
448
449
450
451
452
453
454
455
456
457
458
459
460
461
462
463
464
465
466
467
468
469
470
471
472
473
474
475
476
477
478
479
480
481
482
483
484
485
486
487
488
489
490
491
492
493
494
495
496
497
498
499
500
501
502
503
504
505
506
507
508
509
510
511
512
513
514
515
516
517
518
519
520
521
522
523
524
525
526
527
528
529
530
531
532
533
534
535
536
537
538
539
540
541
542
543
544
545
546
547
548
549
550
551
552
553
554
555
556
557
558
559
560
561
562
563
564
565
566
567
568
569
570
571
572
573
574
575
576
577
578
579
580
581
582
583
584
585
586
587
588
589
590
591
592
593
594
595
596
597
598
599
600
601
602
603
604
605
606
607
608
609
610
611
612
613
614
615
616
617
618
619
620
621
622
623
624
625
626
627
628
629
630
631
632
633
634
635
636
637
638
639
640
641
642
643
644
645
646
647
648
649
650
651
652
653
654
655
656
657
658
659
660
661
662
663
664
665
666
667
668
669
670
671
672
673
674
675
676
677
678
679
680
681
682
683
684
685
686
687
688
689
690
691
692
693
694
695
696
697
698
699
700
701
702
703
704
705
706
707
708
709
710
711
712
713
714
715
716
717
718
719
720
721
722
723
724
725
726
727
728
729
730
731
732
733
734
735
736
737
738
739
740
741
742
743
744
745
746
747
748
749
750
751
752
753
754
755
756
757
758
759
760
761
762
763
764
765
766
767
768
769
770
771
772
773
774
775
776
777
778
779
780
781
782
783
784
785
786
787
788
789
790
791
792
793
794
795
796
797
798
799
800
801
802
803
804
805
806
807
808
809
810
811
812
813
814
815
816
817
|
# Introduction

*Read this in other languages: [English](README.md), [Español](README.es.md), [Deutsch](README.de.md), [Français](README.fr.md).*
[](https://packetsender.com/download)
Packet Sender is an open source utility to allow sending and receiving TCP, UDP, and SSL (encrypted TCP) packets as well as HTTP/HTTPS requests and panel generation. The mainline branch officially supports Windows, Mac, and Desktop Linux (with Qt). Other places may recompile and redistribute Packet Sender. Packet Sender is free and licensed GPL v2 or later. It can be used for both commercial and personal use. If you find the app useful, please consider donating/sponsoring so development may continue.
# Table Of Contents
* [Sponsors](#sponsors)
* Visit [IWL.com](https://www.iwl.com/)
* Visit [NagleCode.com](https://dannagle.com/)
* Visit [Eletiope.com](http://eletiope.com/)
* Visit [John Huntington](https://www.controlgeek.net/)
* [GUI](#gui)
* [Intense Traffic Generator (GUI)](#udptraffic)
* [Network](#network)
* [Downloads](#downloads)
* [iOS Mobile App](#ios)
* [Support](#support)
* [IPv4 Subnet Calculator](#subnetcalculator)
* [Wake-On-LAN / Magic Packet](#wakeonlan)
* [Packet Sender Cloud](#cloud)
* [Portable Mode](#portable)
* [Macros and Smart Responses](#smartresponses)
* [Persistent TCP and SSL](#persistent)
* [HTTP/HTTPS Requests](#http)
* [Panel Generator](#panelgen)
* [Command Line Interface](#cli)
* [Intense Traffic Generator (CLI)](#cliintensetraffic)
* [Building Packet Sender](#building)
<a id="sponsors"></a>
## Sponsors
Packet Sender would like to thank the following sponsors.
[](https://www.iwl.com/)
<br>IWL is a California company creating computer networking products.
<br><br><br>
[](https://dannagle.com)
<br>NagleCode is a software publisher and development studio.
<br><br><br>
[](http://eletiope.com)
<br>Eletiope installs lighting, audiovisuals and immersive rooms for exhibitions and museums, and for corporate showrooms.
<br><br><br>
[John Huntington](https://www.controlgeek.net/)
<br>Author, consultant, educator, sound engineer, award-winning photographer, and storm chaser.
<br><br><br>
[Would you like your name/logo listed here?](https://github.com/sponsors/dannagle)
<a id="support"></a>
## Support
* Twitter/X: [@NagleCode](https://x.com/NagleCode)
* Forums are at: [GitHub Discussions](https://github.com/dannagle/PacketSender/discussions).
* Email: [Packet Sender Contact](https://packetsender.com/contact)
* Connect with me on [LinkedIn](https://www.linkedin.com/in/dannagle/)
*NOTE:* Try (temporarily) disabling your firewall if having problems in Windows.
<a id="downloads"></a>
# Downloads
## Desktop Download
Official releases of Packet Sender can be downloaded at [PacketSender.com](https://packetsender.com/download). Some places redistribute Packet Sender.
  
<!--
Not sure when this will be back.
## Mobile Apps
### Android Mobile App

The Android version is located [on Google Play](https://play.google.com/store/apps/details?id=com.packetsender.compose) or [on Amazon Appstore](https://www.amazon.com/dp/B08RXM6KM2/)
[](https://play.google.com/store/apps/details?id=com.packetsender.compose
-->
<a id="ios"></a>
## iOS Mobile App
The Packet Sender for iOS is fully native, contain bare minimum permissions, and collects no data. This is software that respsects you. Thank you for supporting this effort.
The iOS version is located [on the Apple App Store](https://apps.apple.com/app/id1558236648#?platform=iphone)
[](https://apps.apple.com/app/id1558236648#?platform=iphone)
<a id="gui"></a>
# GUI
Packet Sender is identical for all the desktop versions. The only difference is its theme to match the operating system.

1. A packet has a name, destination address (domain names are default resolved just before sending), port, and data associated with it.
2. In the table, there is a list of saved packets. You can double-click to directly edit fields in this table.
3. In the bottom right, there are UDP, TCP, and SSL server status and port(s). Clicking on these will activate or deactivate the protocol. Packet Sender supports binding to any number of ports.
4. There is also a IP toggle button. Clicking this changes it to IPv4 (default), IPv6, or custom IP
### General Notes
* A resend value of "0" means it is a single-shot packet.
* During packet resending, there will be a button to cancel all resends.
* Please check your firewall. Windows aggressively blocks TCP-based servers. Packet Sender will still work if the firewall blocks it, but it can't receive unsolicited TCP-based packets.
* An optional response can be sent. The same response is used for TCP, UDP, and SSL.
* For IPv6 sending, you will also need the scope ID.
* Packet Sender supports mixed ASCII and HEX notation:
* Double-click either field to bring up the multi-line editor
* \XX gets translated to XX in hex
* \n, \r, \t will get translated to 0A, 0D, and 09
* HEX numbers are space delimited
* The HEX field will attempt to interpret other common delimiters (such as commas, colons (Wireshark), semicolons, " 0x", etc) and auto-correct. It is very fault-tolerent.
* A single stream of HEX is also supported. If the number of bytes is odd, Packet Sender will assume the front byte needs a zero and then auto-correct.
* Example ASCII: hello world\r
* Example HEX: 68 65 6c 6c 6f 20 77 6f 72 6c 64 0d
* You may save a packet directly from the traffic log. You will be prompted for a name, and the source address and port will be switched for your convenience.
* You may also load a file directly in to the HEX field. The HEX field supports sending up to 10,922 bytes. The theoretical limit for sending via the command line is 200 MB.
## Hotkeys/Keyboard Shortcuts
The fields at the top can be navigated using CTRL+1, CTRL+2, etc, up to CTRL+8 (send button). On Mac, the shortcut key is Command.
The hotkeys and fields are:
* CTRL + 1 = Name
* CTRL + 2 = ASCII
* CTRL + 3 = HEX
* CTRL + 4 = Address
* CTRL + 5 = Port
* CTRL + 6 = Resend Delay
* CTRL + 7 = Protocol Selection
* CTRL + 8 = Send (executes)
Some notes:
* The fields are linked to the corresponding hotkey regardless of protocol selection.
* When you navigate to the TCP/UDP/SSL option, you may use up/down or t/u/s/h characters to make a selection.
* If you are going to automate with hotkeys (using tools such at [AutoHotKey](https://www.autohotkey.com/)), you may want to turn off "Restore previous session".
<a id="network"></a>
# Network Features
## Basic Settings
By default, Packet Sender launches with UDP, TCP, and SSL servers enabled on random ports (shown as buttons on the bottom right). You may bind to any number of ports (if the OS allows it), using comma-separated port numbers. For example, `0, 1000, 2000` will bind to "random" and ports 1000, 2000.

The UDP button now shows 3 ports bound. 1 of them is random.

The other setting is to respond to all requests with a reply. You may also have this request be a macro. There is a field to type the reply (or load a saved packet).
## Additional UDP/TCP/SSL Settings
By default, Packet Sender binds to any IPv4 address. In this area of the settings, you may have it bind to any IPv6 instead, or to a specific IP address.
Binding to a specific address is very helpful when there are multiple NICs and you want to force communication (like broadcast packets) out a specific one.

Some protocols expect the server to send data before the client sends (such as many telnet services). This workflow can be enabled with the "Receive Before Send".
If you have a slow device (such an embedded server with a weak processor), you may wish to enable "500 ms delay after connect". This will allow the slow server time to launch its handler.
## IPv4, IPv6, Custom IP
Packet Sender's built-in servers are configured to support either IPv4 or IPv6 but not both at the same time. For clients, Packet Sender GUI and CLI will seamlessly switch between the two modes upon sending (scope ID may be needed for IPv6). Click the IPv4 / IPv6 toggle on the bottom right to switch between the two.
Inside the settings, you may also force Packet Sender's servers to bind to a custom IP address. This can be very useful for systems with multiple NICs or complicated IP setups. Packet Sender will trigger an error if told to bind to an address that does not exist.

<a id="subnetcalculator"></a>
## IPv4 Subnet Calculator
Packet Sender has a built-in subnet calculator. It is under the Tools menu.

* The log window (bottom section) will display non-loopback IPv4 and IPv6 addresses found on your computer.
* On the left side, input the IPv4 address in the IP field.
* On the left side, input the subnet in either X.X.X. or /XX notation
* The results of the calculation are on the right.
* The field below is a quick check to see if an IPv4 is within one of your subnets.
<a id="wakeonlan"></a>
## Wake-On-LAN / Magic Packet
Wake-On-LAN (or WOL) is a protocol that tells computers to wake up from sleep. It is triggered by a broadcast packet with special data based on the target's MAC address. For more information, [take a look at Wikipedia](https://en.wikipedia.org/wiki/Wake-on-LAN).
Packet Sender has a built-in WOL generator. It is under the Tools menu.

Fill out the options, and the main GUI will be filled with the correct data for the WOL format.

There are also CLI options to help generate and send WOL packets
```text
packetsender --wol f8:23:66:30:e5:30
Sending broadcast Wake-On-LAN to target: F8:23:66:30:E5:30 on port 7
UDP (60360)://255.255.255.255:7 ff ff ff ff ff ff f8 23 66 30 e5 30 f8 23 66 30 e5 30 f8 23 66 30 e5 30 f8 23 66 30 e5 30 f8 23 66 30 e5 30 f8 23 66 30 e5 30 f8 23 66 30 e5 30 f8 23 66 30 e5 30 f8 23 66 30 e5 30 f8 23 66 30 e5 30 f8 23 66 30 e5 30 f8 23 66 30 e5 30 f8 23 66 30 e5 30 f8 23 66 30 e5 30 f8 23 66 30 e5 30 f8 23 66 30 e5 30
```
## SSL Client and Server
Packet Sender supports establishing encrypted connections over SSL.
This is supported in the GUI and on the command line.
Packet Sender bundles OpenSSL for use in Windows. On Mac and Linux, Packet Sender will use the native SSL libraries.

SSL Notes:
* The certificate negotiation is handled immediately during connection.
* By default, Packet Sender ignores all SSL errors (expired cert, wrong host name, self-signed, etc).
* Packet Sender outputs the cert negotiation progress in to the traffic log.
* Packet Sender outputs the encryption algorithm used in the traffic log (such as AES 128).
Packet Sender bundles an internal "Snake Oil" certificate for use as a server for Windows. The certificate and key is in the same place as packet and settings.
_Note: Overriding the cert locations in Settings also overrides the snake-oil certificate._
If there is an SSL error, Packet Sender will output it to the traffic log. If the setting is to continue anyway (default), it will continue to negotiate encryption. Otherwise, the connection ends with failure to connect.

## Multicast (Experimental)
Packet Sender's multicast support is triggered by attempting to send to a IPv4 multicast address or from the mulitcast submenu. The feature is currently experimental and has these known problems.
* Packet Sender abandons IPv6 support when joining multicast.
* And stays abandoned until you revisit settings or attempt to send to IPv6
* On wifi, it sometimes takes 20 seconds for multicast join to actually take effect.
* Packet Sender has no logic to rejoin a mulitcast group if the switch reboots or some other common error.
There is no IPv6 multicast support, though it is on the roadmap. Sponsors wanting IPv6 multicast support are welcome to contact me.
<a id="udptraffic"></a>
## UDP Traffic Generator (Experimental)
For when the normal send system is not enough, you can hammer a target IP with packets to see if your device can handle it. This can be found in the GUI toolbar at _Tools -> Intense Traffic Generator_
Please note that this feature is experimental and the metrics displayed have not been fully tested. For a more accurate test, you may want to look at the CLI version of this tool.

# Packet Sender Features
<a id="cloud"></a>
## Packet Sender Cloud
Packet sets can be quickly saved/retrieved/shared using the free [Packet Sender Cloud](https://cloud.packetsender.com/) service. The cloud may also be used to publicly display and distribute your packets (via an URL) for collaboration, tutorials, end users, etc. Packet Sender may import public packet sets with public URL.
There are various reasons to do this:
* Keeping all your packets ready so you can quickly retrieve them when installing a fresh Packet Sender
* Quickly swapping between packet sets when working on different projects.
* Sharing a login (it is allowed) for collaborative packet set generation
* Having a public page of your packet sets so others can quickly find and import

If you are publishing a network API, maintaining a public cloud page is significantly easier than painfully detailing (IP, port, type, etc) the packets to your users. Plus, updating that page is easy.
More information about it can be found at
https://cloud.packetsender.com/help
<a id="portable"></a>
## Portable Mode
Packet Sender has a "portable" mode. At launch, it will look for `portablemode.txt` and populate any missing settings files in that run-time directory. These files are `packets.ini`, `ps_settings.ini`, `ps.key`, and `ps.pem`.
You may also have some files portable and the other in their standard location by removing portablemode.txt.
### DDLs that can be removed in Console-only portable Mode
If you do not require the GUI, you may remove these DDLs
- Qt6Svg.dll
- Qt6Widgets.dll
- Qt6Gui.dll
- opengl32sw.dll
- D3Dcompiler_47.dll
- iconengines directory
- imageformats directory
- styles directory
Note that DLLs with `+` characters in their names that can cause problems with Windows command-line copy if you do not surround them with `"` .
### DDLs that can be removed if you do not need secure connections
If you do not require SSL, you may remove these DDLs
- libcrypto-1_1-x64.dll
- libssl-1_1-x64.dll
The run-time directory Windows users is the same place as the .exe.
For MAC users, this run-time directory is at `PacketSender.app/Contents/MacOS`.
If INI files are found, it will use them instead of `%APPDATA%` or `Library/Application Support`.
<a id="smartresponses"></a>
## Smart Responses
Packet Sender supports up to 5 smart responses.
To enable this feature, go to _File -> Settings_ at the GUI toolbar. Go to the _Smart Responses_ tab and enable the **Send a Smart Response** checkbox.

* Packet Sender will compare the packet within the encoding you choose.
* Packet Sender translates the encoding before sending out the reply.
* The available encodings are:
* Mixed ASCII -- The standard Packet Sender way of encoding ASCII along with non-printable characters
* HEX -- Packet Sender's normal HEX encoding
## Macros
Packet Sender supports these macros when sending responses:
* {{DATE}} -- Sends the current date in "yyy-mm-dd" format.
* {{TIME}} -- Sends the current time in "hh:mm:ss ap" format.
* {{UNIXTIME}} -- Sends the current epoch time stamp.
* {{COUNTER}} -- Sends an incrementing counter for each packet that uses it. Starts at 1 at launch.
* {{RANDOM}} -- Sends a random number ranging from either 0 to 32767 or 2147483647, depending on 32-bit or 64-bit (default installer for Windows is 32-bit. Mac is 64-bit).
* {{UNIQUE}} -- Sends a random string. Uses an internal UUID to generate it.
Packet Sender will swap the macro with real values before sending.
<a id="persistent"></a>
## Persistent TCP and SSL
Packet Sender supports persistent TCP and SSL connections via a separate GUI window. It is enabled by a checkbox on the main window or through the Settings window.

### Notes on Persistent TCP and SSL:
* Any number of persistent connections can be created.
* Previously saved packets can be loaded in the drop-down.
* There is a "Raw" view and "ASCII" view. The ASCII view is useful to troubleshoot data that is not printed by the raw view.
* Traffic is also saved in the main window traffic log.
* A file may be uploaded to the persistent connection. You may wish to turn off logging if you use this.
* The timer in the bottom left starts as soon as a valid data packet is sent/received. It stops when the connection is closed.
* You may optionally append a carriage return when you quick-send by hitting the return key. This is useful for command-prompt menus over TCP / SSL connections. Packet Sender remembers previous state of \r checkbox.
* Incoming persistent connections to the server will launch the separate GUI window.
* During resend, the persistent connection packet is carried over to the new GUI window. Clicking "Resending(1)" will cancel it.
Persistent connections are not supported via the command line.
<a id="http"></a>
# HTTP/HTTPS POST & GET
Packet Sender supports sending POST/GET requests via HTTP and HTTPS.
Protocol dropdown includes the following options: HTTP GET, HTTP POST, HTTPS GET, HTTPS POST. When selecting HTTP(S), input fields will udpate to: Name, Request, Address, Data (when POST is selected), Generate Data button (when POST is selected), Load FIle (when POST is selected).
## Sending HTTP/HTTPS GET/POST Requests

* Select HTTP(S) GET or POST from the protocol dropdown
* In *Address* field input the domain or IP
* In *Request* field add the URL path, if needed
* In *Port* field, the default for HTTP is 80 and HTTPS is 443
* Check *Persistent TCP* to see the server data more clearly (HTTP headers are removed automatically).
**You may also paste a complete URL in the Request field and Packet Sender will parse and auto-populate the other fields.**
### For POST Requests:
* You can manually add in the data into the *Data* field.
* Format would go: key=value
* For multiple paramaters: key=value&key=value&key=value
* Or you can click on the *Generate Data* button
<img src="/screenshots/ps_http_datagenerator.PNG" width="400" height="284">
* To add data, input the Key and Value parameters. Click the **+** button.
* Can add multiple parameters with the + button.
* Remove parameters by clicking the X button next to the parameter
* Once parameters are added, click Ok and data will be generated in the Data field.
### To add Authentication credentials:
<img src="/screenshots/ps_http_authgenerator.PNG" width="800" height="339">
* Go to File -> Settings -> HTTP
* Check *Generate Auth Header*
* Input the *Host*, *UN/Client ID*, and *PW/Access*
* Click on *HTTP Auth Header* to generate the authentication header
<a id="panelgen"></a>
# Panel Generator
Packet Sender supports generating control panels. Panels consist of buttons with scripts (packets) assigned to them. Clicking the button will execute the packet(s) referenced on that button.
<img src="/screenshots/ps_panel_1.PNG" width="400" height="358">
## Loading a Panel
Panels can be created one of two ways:
* Clicking **Panels** on the toolbar and selecting either Load Starter Panel or Empty Panel Project
* Load Starter Panel will load the Panel assigned as starter. If no panel is set as the starter, an empty panel project will open.
* Highlighting 2 or more saved packets and clicking on the **Generate Panel** button (Generate Panel button only appears when multiple packets are selected)
Packet Sender supports launching in panel-only mode with the starter panel using the command line option `--starterpanel`

## Scripting a Panel
To begin scripting the buttons on your panel, you will need to open a panel and go to the Editing screen. Once a panel project is opened, check the button in the bottom right corner. If this button says "Viewing", you are on the Viewing screen. Click the button to move the panel to the Editing screen.
Once at the Editing screen, buttons and scripts can be added to the panel.
### Button Scripting
Button scripts will contain the name of the packet to be sent.
<img src="/screenshots/ps_panel_2.PNG" width="400" height="360">
Multiple packets can be set to a button by adding each name on a new line.
<img src="/screenshots/ps_panel_5.PNG" width="400" height="358">
Panel Generator supports adding a delay between multiple packets by adding "delay:_# of seconds_" in between packets.
<img src="/screenshots/ps_panel_4.PNG" width="400" height="359">
Panel Generator supports adding a script to load a new panel by adding "panel:_panel id #_". Once all previous scripts on the button are executed, the Panel will transition to the next panel.
<img src="/screenshots/ps_panel_8.PNG" width="400" height="358">
### Adding Files/URLs
Panel Generator supports adding buttons that link to locally-stored files or URLs.
File/URL buttons can be added while in the Editing screen by clicking the *+* in the bottom right corner.
* For files: Go to the file on the PC, right click on the file and select Copy. Paste this into the _URL or File_ textbox in Packet Sender
* For URLs: Copy the URL into the _URL or File_ textbox in Packet Sender
* URLs must begin with http:// or https://

Once the file or URL is copied, you will be prompted to input a name for the button. Buttons will populate at the bottom of the panel.
While on the Editing screen, clicking these buttons will allow you to edit the file/URL link and the name of the button. You can also delete the button by clicking the **X** on the popup.

When on the Viewing screen, clicking these buttons will launch the URL in the default browser or open the file (with the default program for the file type).

### Panel Editing/Saving
While in the Editing screen of a Panel, there will be a toolbar with menus File, Export, Settings, Help. You can save, export, import, load panel projects, and edit the current panel project from this toolbar.
From Settings, you can do the following:
* Set Panel Name - select this to rename the current panel project
* Set Panel ID - select this to change the ID associated with the current panel project
_Note: Setting an ID in use will replace that panel_
* Starter Panel - select this to set the current panel project as the starter panel.
* Delete Panel - This will bring up a menu of current panel projects. Select a panel project to delete it. _Note: Buttons and scripts will be retained on the Editing screen until the Panel is closed_
# DTLS
For now, DTLS is only supported in the GUI with Windows. Other operating systems may enable DTLS by compiling from source using Qt6.
## Overview
This repository contains a DTLS (Datagram Transport Layer Security) protocol feature. This feature have added a graphical interface to configure and manage DTLS connections, including server verification and session persistence options.
## Features
### Main Window
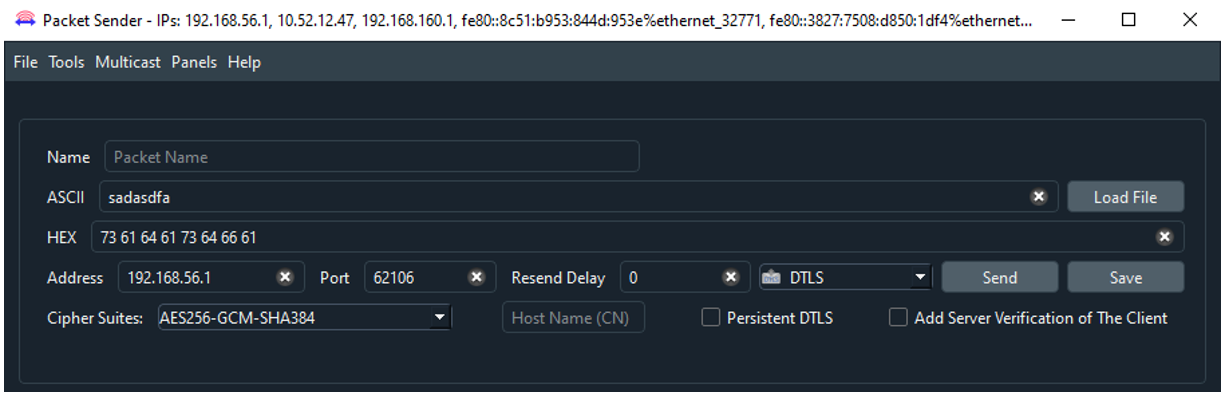
- **Cipher Suites**: Dropdown to select the desired cipher suite for DTLS communication.
- **Server Common Name**: Field to input the server’s common name for client-side verification.
- **Persistent Session**: Option to save the session key after the first handshake by enabling the persistent checkbox.
- **Optional Server Verification**: An option for enabling two-sided verification during the handshake.
- **DTLS Server Port**: Button to define the DTLS server port for the connection.
#### Additional Images:

- A detailed view of the cipher suite selection dropdown.

- Persistent connection window while DTLS.

- On click button for DTLS server Enabling or disabling.
### Settings Window
#### Network Tab

- **Send Simple Acknowledge**: Checkbox to enable the sending of a simple acknowledgment.
- **Enable DTLS Server**: Option to enable the DTLS server and select a port.
- **Certificates and Keys**: Certificates and keys can be loaded similarly to SSL configuration.
#### Smart Responses Tab

- **Smart Responses**: Smart responses feature works over the DTLS protocol.
## Wireshark Integration
Sniffing by Wireshark:
### Regular Connection

- Example of a regular DTLS connection captured sniffed by Wireshark.
### Persistent Connection

- Example of a persistent DTLS connection sniffed by Wireshark.
<a id="cli"></a>
# Command Line
Packet Sender can be used from the command line on your computer.
For Windows, use the extension .com (`packetsender.com`) to use the command line interface. Optionally, you can also use `packetsender` without an extension. Using the extension .exe will launch the GUI.

For Linux, the command line system in Packet Sender follows the same pattern as other Linux utilities. It has a long name (such as --version) and a short name (such as -v). These options can be arranged in any order and Packet Sender will parse them correctly. The last 3 options are positional and must appear last. They are IP, port, and data. These last options are optional if using a stored packet.
```text
packetsender --help
Usage: C:\Program Files\PacketSender\packetsender.com [options] address port data
Packet Sender is a Network UDP/TCP/SSL/HTTP Test Utility by NagleCode
See https://PacketSender.com/ for more information.
Options:
-h, --help Displays help on commandline options.
--help-all Displays help including Qt specific options.
-v, --version Displays version information.
-q, --quiet Quiet mode. Only output received data.
-x, --hex Parse data-to-send as hex (default for
TCP/UDP/SSL).
-a, --ascii Parse data-to-send as mixed-ascii (default for http
and GUI).
-A, --ASCII Parse data-to-send as pure ascii (no \xx
translation).
-l, --listen Listen instead of send. Use bind options to specify
port/IP. Otherwise, dynamic/All.
-r, --response <ascii> Server mode response data in mixed-ascii. Macro
supported.
-w, --wait <ms> Wait up to <milliseconds> for a response after
sending. Zero means do not wait (Default).
-f, --file <path> Send contents of specified path. Max 10 MiB for
UDP, 100 MiB for TCP/SSL.
-b, --bind <port> Bind port. Default is 0 (dynamic).
-6, --ipv6 Force IPv6. Same as -B "::". Default is IP:Any.
-4, --ipv4 Force IPv4. Same as -B "0.0.0.0". Default is
IP:Any.
-B, --bindip <IP> Bind custom IP. Default is IP:Any.
-t, --tcp Send TCP (default).
-s, --ssl Send SSL and ignore errors.
-S, --SSL Send SSL and stop for errors.
-u, --udp Send UDP.
--http <http> Send HTTP. Allowed values are GET (default) and
POST
-n, --name <name> Send previously saved packet named <name>. Other
options overrides saved packet parameters.
--wol <mac> Send Wake-On-LAN / Magic Packet to <mac> and
(optional) <port>.
--bps <bps> Intense traffic. Calculate rate based on value of
bits per second.
--num <number> Intense traffic. Number of packets to send. Default
unlimited.
--rate <Hertz> Intense traffic. Rate. Ignored in bps option.
--usdelay <microseconds> Intense traffic. Resend delay. Used if rate is 0.
Ignored in bps option.
--max Intense traffic. Run as fast as possible.
Arguments:
address Destination address/URL. Optional for saved packet.
port Destination port/POST data. Optional for saved
packet.
data Data to send. Optional for saved packet.
```
## Example CLI
The CLI follows the same format between Windows, Linux, and MAC.
The format is: `packetsender [options] address port data`
```text
packetsender -taw 500 mirrors.xmission.com 21 "USER anonymous\r\nPASS chrome@example.com\r\n"
TCP (65505)://mirrors.xmission.com:21 55 53 45 52 20 61 6e 6f 6e 79 6d 6f 75 73 0d 0a 50 41 53 53 20 63 68 72 6f 6d 65 40 65 78 61 6d 70 6c 65 2e 63 6f 6d 0d 0a
Response Time:5:51:37.042 pm
Response HEX:32 32 30 2D 57 65 6C 63 6F 6D 65 20...
Response ASCII:220-Welcome to XMission Internet...
```
## Example CLI to listen for packets (Server Mode)
Use the existing bind options to configure the server.
- -b for port
- -B for iP
- -t/-u/-s for TCP, UDP, or SSL
- -r to send an response (macro supported ASCII)
Binding to dynamic port using TCP
```text
packetsender -l
TCP Server started on 0.0.0.0:52567
Use ctrl+c to exit server.
From: 127.0.0.1, Port:52568
Response Time:2024-06-04 19:01:53.198
Response HEX:48 65 6C 6C 6F
Response ASCII:Hello
From: 127.0.0.1, Port:52569
Response Time:2024-06-04 19:02:24.063
Response HEX:57 6F 72 6C 64
Response ASCII:World
```
Binding to port 8080 using UDP
```text
packetsender -l -u -b 8080
UDP Server started on 0.0.0.0:8080
Use ctrl+c to exit server.
From: ::ffff:127.0.0.1, Port:49500
Response Time:2024-06-04 19:04:28.890
Response HEX:48 65 6C 6C 6F 20 55 44 50 20 50 61 63 6B 65 74
Response ASCII:Hello UDP Packet
```
Binding to port 8080 using UDP with current time response
```text
packetsender -l -u -b 8080 -r "{{TIME}}"
Loading response packet.
UDP Server started on 0.0.0.0:8080
Use ctrl+c to exit.
From: ::ffff:127.0.0.1, Port:59594
Response Time:2024-06-05 20:48:18.180
Response HEX:68 65 6C 6C 6F 20 70 61 63 6B 65 74 20 73 65 6E 64 65 72
Response ASCII:hello packet sender
From: You (Response), Port:59594
Response Time:2024-06-05 20:48:18.182
Response HEX:30 38 3a 34 38 3a 31 38 20 70 6d
Response ASCII:08:48:18 pm
```
Binding to IP 192.168.86.26, port 54321 using SSL
```text
packetsender -l -s -B 192.168.86.26 -b 54321
Binding to custom IP 192.168.86.26
Listening for SSL packets in server mode.
SSL Server started on 192.168.86.26:54321
Use ctrl+c to exit server.
From: 192.168.86.26, Port:52588
Response Time:2024-06-04 19:11:30.726
Error/Info:Encrypted with AESGCM(256)
From: 192.168.86.26, Port:52588
Response Time:2024-06-04 19:11:30.726
Error/Info:Authenticated with RSA
From: 192.168.86.26, Port:52588
Response Time:2024-06-04 19:11:30.726
Error/Info:Peer cert issued by
From: 192.168.86.26, Port:52588
Response Time:2024-06-04 19:11:30.726
Error/Info:Our Cert issued by SnakeOil
From: 192.168.86.26, Port:52588
Response Time:2024-06-04 19:11:30.747
Response HEX:43 6F 6F 6C 20 53 53 4C
Response ASCII:Cool SSL
```
## Examples binding to port and custom IP, IPv4, or IPv6
Packet Sender command line can bind to custom ports to force IPv4/6 modes or multiple NIC using the -B option.
```text
packetsender -taw 3000 fe80::c07b:d517:e339:5a08 5005 "Hello\r"
packetsender -taw 3000 192.168.0.201 5005 "Hello\r"
packetsender -B 192.168.0.200 -taw 3000 192.168.0.201 5005 "Hello\r"
packetsender -B fe80::a437:399a:3091:266a%ethernet_32769 -taw 3000 fe80::c07b:d517:e339:5a08 5005 "Hello\r"
packetsender -B fe80::a437:399a:3091:266a -taw 3000 fe80::c07b:d517:e339:5a08 5005 "Hello\r"
```
## Example CLI using SSL and ignoring errors
The command line has the option to ignore or abandon on SSL errors. The default is to ignore.
* Use -s option to send SSL and ignore errors.
* Use -S option to send SSL and stop for errors
```text
packetsender -saw 500 expired.packetsender.com 443 "GET / HTTP/1.0\r\n\r\n"
SSL Error: The certificate has expired
SSL (54202)://expired.packetsender.com:443 47 45 54 20 2f 20 48 54 54 50 2f 31 2e 30 0d 0a 0d 0a
Cipher: Encrypted with AES(128)
Response Time:3:24:55.695 pm
Response HEX:48 54 54 50 2f 31 2e 31 20 34 32 31 20 0d 0a 53 65 72 76 65 72 3a 20 6e 67 69 6e 78 2f 31 2e 31 30 2e 30 20 28 55 62 75 6e 74 75 29 0d
Response ASCII:HTTP/1.1 421 \r\nServer: nginx/1.10.0 (Ubuntu)\r
```
## Example CLI using HTTP
Note this uses the built-in default packets.
```text
packetsender --name "HTTPS POST Params"
packetsender --http GET "https://httpbin.org/get"
packetsender --http POST "https://httpbin.org/post" "{}"
```
<a id="cliintensetraffic"></a>
## Example using CLI Intense Traffic Generator
The command intense traffic generator works much the same way as the GUI version but it is a bit more accurate, with more control options, (and more intensity!).
See below for examples how to use it. Note that these calculations are "Best Effort". It does OK, but processor spikes or various network hiccups can throw it off. The threading is not real-time, and is not super-smart with its attempts to compensate.
* Resend "My Awesome Packet" at a rate of 20 Hz
* Resend "My Awesome Packet" at a bps of 2000 baud
* Resend "My Awesome Packet" as fast as possible
* Resend "My Awesome Packet" with 2000000 microsecond delay between each packet
**Note: For Windows, use the ".com" build, so each example would be packetsender.com**
```text
packetsender --rate 20 --name "My Awesome Packet"
packetsender --bps 2000 --name "My Awesome Packet"
packetsender --rate 0 --name "My Awesome Packet"
packetsender --usdelay 2000000 --name "My Awesome Packet"
```
<a id="building"></a>
# Building Packet Sender
The only dependency is Qt SDK
## Building Packet Sender for Windows/MAC
1. Download the Qt installer from https://www.qt.io/download-open-source/
1. Let it install MingGW if you don't have a compiler.
1. Open the project PacketSender.pro
1. Build!
The Windows and Mac versions were built using Qt 5.12. Packet Sender does support Qt 6, however it does not
support cmake.
## Building Packet Sender for Linux
Here is the sequence of commands for Ubuntu 16.04. Please adapt to your Linux platform. Packet Sender requires no additional libraries beyond the stock Qt SDK. I have been told there are build issues with stock Fedora. If a Fedora wizard has insight, please let me know, and I'll add your instructions.
If you are feeling adventurous, feel free to build from the master branch. It contains the latest stable build. The development branch should probably be avoided.
```bash
sudo apt-get update
sudo apt-get install qt5-default build-essential
wget https://github.com/dannagle/PacketSender/archive/(Version).tar.gz
tar -xzvf (Version).tar.gz
cd PacketSender-(Version)/src
qmake PacketSender.pro
make
```
To run use:
```text
./PacketSender
```
If it doesn't run, you may need to set it executable
```text
chmod a+x PacketSender
```
# Enhancements/Requests
Missing a feature? You can [hire me to add it to Packet Sender](https://packetsender.com/enhancements).
# Legal / Compliance
License is GPL v2 or Later. [Contact me](https://packetsender.com/contact) if you require a different license.
Some distributions of Packet Sender may use [OpenSSL](https://www.openssl.org/).
The most current VPAT [may be found](vpat_2.4_packetsender.pdf) in this repo.
# Copyright
Packet Sender was written by [Dan Nagle](https://dannagle.com/) and is published by © NagleCode, LLC - [@NagleCode](https://x.com/NagleCode) - [PacketSender.com](https://packetsender.com)
|
