1
2
3
4
5
6
7
8
9
10
11
12
13
14
15
16
17
18
19
20
21
22
23
24
25
26
27
28
29
30
31
32
33
34
35
36
37
38
39
40
41
42
43
44
45
46
47
48
49
50
51
52
53
54
55
56
57
58
59
60
61
62
63
64
65
66
67
68
69
70
71
72
73
74
75
76
77
78
79
80
81
82
83
84
85
86
87
88
89
90
91
92
93
94
95
96
97
98
99
100
101
102
103
104
105
106
107
108
109
110
111
112
113
114
115
116
117
118
119
120
121
122
123
124
125
126
127
128
129
130
131
132
133
134
135
136
137
138
139
140
141
142
143
144
145
146
147
148
149
150
151
152
153
154
155
156
157
158
159
160
161
162
163
164
165
166
167
168
169
170
171
172
173
174
175
176
177
178
179
180
181
182
183
184
185
186
187
188
189
190
191
192
193
194
195
196
197
198
199
200
201
202
203
204
205
206
207
208
209
210
211
212
213
214
215
216
217
218
219
220
221
222
223
224
225
226
227
228
229
230
231
232
233
234
235
236
237
238
239
240
241
242
243
244
245
246
247
248
249
250
251
252
253
254
255
256
257
258
259
260
261
262
263
264
265
266
267
268
269
270
271
272
273
274
275
276
277
278
279
280
281
282
283
284
285
286
287
288
289
290
291
292
293
294
295
296
297
298
299
300
301
302
303
304
305
306
307
308
309
310
311
312
313
314
315
316
317
318
319
320
321
322
323
324
325
326
327
328
329
330
331
332
333
334
335
336
337
338
339
340
341
342
343
344
345
346
347
348
349
350
351
352
353
354
355
356
357
358
359
360
361
362
363
364
365
366
|
pyvirtualdisplay is a python wrapper for [Xvfb][1], [Xephyr][2] and [Xvnc][3]
Links:
* home: https://github.com/ponty/pyvirtualdisplay
* PYPI: https://pypi.python.org/pypi/pyvirtualdisplay

Features:
- python wrapper
- supported python versions: 3.6, 3.7, 3.8, 3.9, 3.10
- back-ends: [Xvfb][1], [Xephyr][2] and [Xvnc][3]
Possible applications:
* headless run
* GUI testing
* automatic GUI screenshot
Installation
============
install the program:
```console
$ python3 -m pip install pyvirtualdisplay
```
optional: [Pillow][pillow] should be installed for ``smartdisplay`` submodule:
```console
$ python3 -m pip install pillow
```
optional: [EasyProcess][EasyProcess] should be installed for some examples:
```console
$ python3 -m pip install EasyProcess
```
optional: xmessage and gnumeric should be installed for some examples.
On Ubuntu 20.04:
```console
$ sudo apt install x11-utils gnumeric
```
If you get this error message on Linux then your Pillow version is old.
```
ImportError: ImageGrab is macOS and Windows only
```
Install all dependencies and backends on Ubuntu 20.04:
```console
$ sudo apt-get install xvfb xserver-xephyr tigervnc-standalone-server x11-utils gnumeric
$ python3 -m pip install pyvirtualdisplay pillow EasyProcess
```
Usage
=====
Controlling the display with `start()` and `stop()` methods:
```py
from pyvirtualdisplay import Display
disp = Display()
disp.start()
# display is active
disp.stop()
# display is stopped
```
After Xvfb display is activated "DISPLAY" environment variable is set for Xvfb.
(e.g. `os.environ["DISPLAY"] = :1`)
After Xvfb display is stopped `start()` and `stop()` are not allowed to be called again, "DISPLAY" environment variable is restored to its original value.
Controlling the display with context manager:
```py
from pyvirtualdisplay import Display
with Display() as disp:
# display is active
pass
# display is stopped
```
Selecting Xvfb backend:
```py
disp=Display()
# or
disp=Display(visible=False)
# or
disp=Display(backend="xvfb")
```
Selecting Xephyr backend:
```py
disp=Display(visible=True)
# or
disp=Display(backend="xephyr")
```
Selecting Xvnc backend:
```py
disp=Display(backend="xvnc")
```
Setting display size:
```py
disp=Display(size=(100, 60))
```
Setting display color depth:
```py
disp=Display(color_depth=24)
```
Headless run
------------
A messagebox is displayed on a hidden display.
```py
# pyvirtualdisplay/examples/headless.py
"Start Xvfb server. Open xmessage window."
from easyprocess import EasyProcess
from pyvirtualdisplay import Display
with Display(visible=False, size=(100, 60)) as disp:
with EasyProcess(["xmessage", "hello"]) as proc:
proc.wait()
```
Run it:
```console
$ python3 -m pyvirtualdisplay.examples.headless
```
If `visible=True` then a nested Xephyr window opens and the GUI can be controlled.
vncserver
---------
The same as headless example, but it can be controlled with a VNC client.
```py
# pyvirtualdisplay/examples/vncserver.py
"Start virtual VNC server. Connect with: vncviewer localhost:5904"
from easyprocess import EasyProcess
from pyvirtualdisplay import Display
with Display(backend="xvnc", size=(100, 60), rfbport=5904) as disp:
with EasyProcess(["xmessage", "hello"]) as proc:
proc.wait()
```
Run it:
```console
$ python3 -m pyvirtualdisplay.examples.vncserver
```
<!-- embedme doc/gen/vncviewer_localhost:5904.txt -->
Check it with vncviewer:
```console
$ vncviewer localhost:5904
```

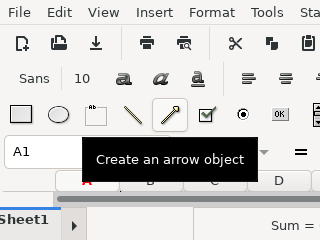
GUI Test
--------
```py
# pyvirtualdisplay/examples/lowres.py
"Testing gnumeric on low resolution."
from easyprocess import EasyProcess
from pyvirtualdisplay import Display
# start Xephyr
with Display(visible=True, size=(320, 240)) as disp:
# start Gnumeric
with EasyProcess(["gnumeric"]) as proc:
proc.wait()
```
<!-- embedme doc/gen/python3_-m_pyvirtualdisplay.examples.lowres.txt -->
Run it:
```console
$ python3 -m pyvirtualdisplay.examples.lowres
```
Image:
Screenshot
----------
```py
# pyvirtualdisplay/examples/screenshot.py
"Create screenshot of xmessage in background using 'smartdisplay' submodule"
from easyprocess import EasyProcess
from pyvirtualdisplay.smartdisplay import SmartDisplay
# 'SmartDisplay' instead of 'Display'
# It has 'waitgrab()' method.
# It has more dependencies than Display.
with SmartDisplay() as disp:
with EasyProcess(["xmessage", "hello"]):
# wait until something is displayed on the virtual display (polling method)
# and then take a fullscreen screenshot
# and then crop it. Background is black.
img = disp.waitgrab()
img.save("xmessage.png")
```
<!-- embedme doc/gen/python3_-m_pyvirtualdisplay.examples.screenshot.txt -->
Run it:
```console
$ python3 -m pyvirtualdisplay.examples.screenshot
```
Image:

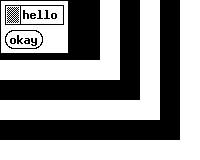
Nested Xephyr
-------------
```py
# pyvirtualdisplay/examples/nested.py
"Nested Xephyr servers"
from easyprocess import EasyProcess
from pyvirtualdisplay import Display
with Display(visible=True, size=(220, 180), bgcolor="black"):
with Display(visible=True, size=(200, 160), bgcolor="white"):
with Display(visible=True, size=(180, 140), bgcolor="black"):
with Display(visible=True, size=(160, 120), bgcolor="white"):
with Display(visible=True, size=(140, 100), bgcolor="black"):
with Display(visible=True, size=(120, 80), bgcolor="white"):
with Display(visible=True, size=(100, 60), bgcolor="black"):
with EasyProcess(["xmessage", "hello"]) as proc:
proc.wait()
```
<!-- embedme doc/gen/python3_-m_pyvirtualdisplay.examples.nested.txt -->
Run it:
```console
$ python3 -m pyvirtualdisplay.examples.nested
```
Image:
xauth
=====
Some programs require a functional Xauthority file. PyVirtualDisplay can
generate one and set the appropriate environment variables if you pass
``use_xauth=True`` to the ``Display`` constructor. Note however that this
feature needs ``xauth`` installed, otherwise a
``pyvirtualdisplay.xauth.NotFoundError`` is raised.
Concurrency
===========
If more X servers are started at the same time then there is race for free display numbers.
_"Recent X servers as of version 1.13 (Xvfb, too) support the -displayfd command line option: It will make the X server choose the display itself"_
https://stackoverflow.com/questions/2520704/find-a-free-x11-display-number/
Version 1.13 was released in 2012: https://www.x.org/releases/individual/xserver/
First help text is checked (e.g. `Xvfb -help`) to find if `-displayfd` flag is available.
If `-displayfd` flag is available then it is used to choose the display number.
If not then a free display number is generated and there are 10 retries by default
which should be enough for starting 10 X servers at the same time.
`displayfd` usage is disabled on macOS because it doesn't work with XQuartz-2.7.11, always 0 is returned.
Thread safety
=============
All previous examples are not thread-safe, because `pyvirtualdisplay` replaces `$DISPLAY` environment variable in global [`os.environ`][environ] in `start()` and sets back to original value in `stop()`.
To make it thread-safe you have to manage the `$DISPLAY` variable.
Set `manage_global_env` to `False` in constructor.
```py
# pyvirtualdisplay/examples/threadsafe.py
"Start Xvfb server and open xmessage window. Thread safe."
import threading
from easyprocess import EasyProcess
from pyvirtualdisplay.smartdisplay import SmartDisplay
def thread_function(index):
# manage_global_env=False is thread safe
with SmartDisplay(manage_global_env=False) as disp:
cmd = ["xmessage", str(index)]
# disp.new_display_var should be used for new processes
# disp.env() copies global os.environ and adds disp.new_display_var
with EasyProcess(cmd, env=disp.env()):
img = disp.waitgrab()
img.save("xmessage{}.png".format(index))
t1 = threading.Thread(target=thread_function, args=(1,))
t2 = threading.Thread(target=thread_function, args=(2,))
t1.start()
t2.start()
t1.join()
t2.join()
```
Run it:
```console
$ python3 -m pyvirtualdisplay.examples.threadsafe
```
Images:


Hierarchy
=========

[1]: http://en.wikipedia.org/wiki/Xvfb
[2]: http://en.wikipedia.org/wiki/Xephyr
[3]: https://tigervnc.org/
[pillow]: https://pillow.readthedocs.io
[environ]: https://docs.python.org/3/library/os.html#os.environ
[EasyProcess]: https://github.com/ponty/EasyProcess
|
